Search the Community
Showing results for tags 'v1.4.0.48'.
Found 1 result
-
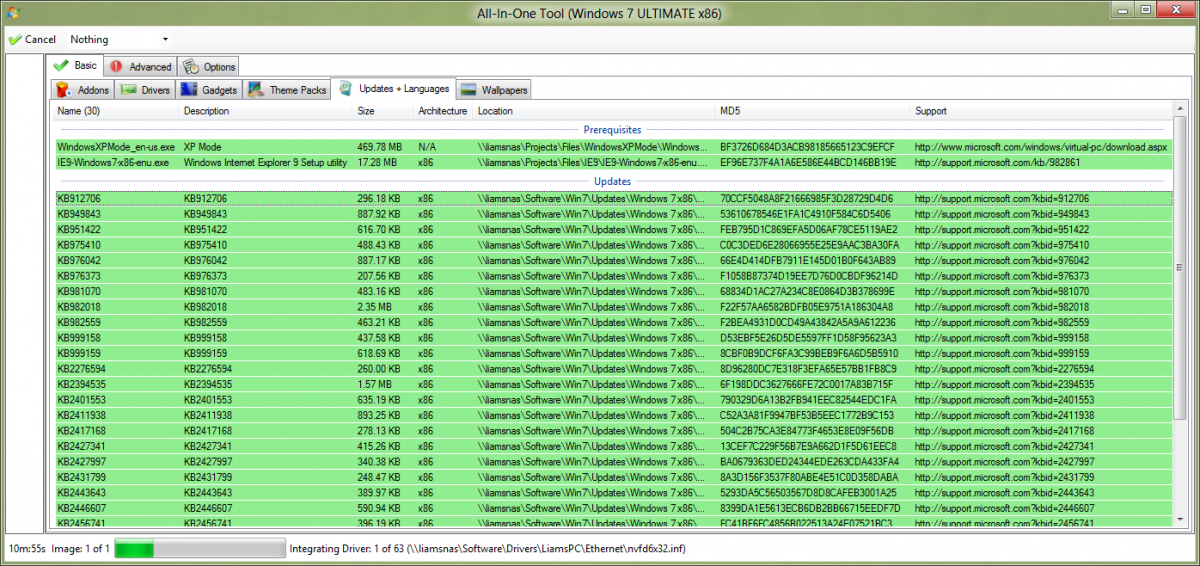
Introduction The 'All-In-One Integrator' is one of the most important tools available in Windows 7 Toolkit, this is the tool which lets you integrate everything into your image such as Updates, Drivers, Wallpapers, Tweaks, Gadgets, etc... but it also lets your remove things too, so lets get started... Selecting your image When you first load the 'AIO Integrator' you will be asked which image you wish you use, if the list it empty, click 'Browse' and select your extract ISO or select the install.wim directly. Once done you should see a list of images, you can either double click an item or press select. TIP: You can hold ctrl or shift to select more than one image, once done press 'Select'. Select your preset If you have used this tool before then you will be greeted by a list of things you have previously done, you can simply select a previous tasks and click 'Load Preset' or if you want to start fresh and do something different then press 'Skip (No Preset)'. ---Basic--- This tab has all the most important tools, to get the most basic jobs done such as integrate updates and drivers. I recommend beginners or new users to stick to this tab. Basic: Addons Addons are pre-installed programs which have been created by other users (usually *reaper*), they have the file extension *.WA, I would probably say programs such as crap cleaner and flash are the most common. If you have any addons then press 'Add Addons' at the top or the green '+' button on the left to add them to this list. Basic: Drivers Drivers are what make your devices and hardware work, sometimes its easy just to them them already installed after you have installed Windows. If you want to add some you just have to press 'Add Drivers' and browse to the folder which contains your drivers (*.inf files). You may notice that not all of them get added, this is because W7T does not include duplicate drivers with the same MD5 files and not all *.inf files are actually drivers and just normal inf files. Colours Red: If the user has selected an x86 image and then adds an x64 driver to the integration list then that driver will display red. Blue: When adding drivers to the list Win Toolkit also makes note of the *.inf MD5 hash, if there's another driver with the same MD5 hash then the items will change to a blue. Basic: Gadgets Gadgets are those little widgets things on your desktop, for example 'CPU Meter'. On Vista they had the gadget bar but on Windows 7 you can place them anywhere. If you want to have addons pre-installed then click 'Add Gadgets' and select all of your *.gadget files. Basic: Theme Packs These area of the tool lets you add your Windows themes, so when you have installed Windows you can select from your favourite theme packs. Just click 'Add Themes' and select your *.themepack files. Basic: Updates + Languages Its very handy to have all of the Windows updates installed. This makes sure your computer is up-to-date, bug free and more secure. Click 'Add Updates' and simply selected your *.MSU or *.CAB files and they will be added to the list, alternatively you can change the drop down box from MSU/CAB to EXE which will allow you to install Internet Explorer 9 and Windows XP Mode. NOTE: If you wish to install updates in LDR/QFE Mode then the option to do that is on the 'Options' tab at the top. Basic: Wallpapers As usual, this one is pretty self-explanatory, here you can add your favourite desktop wallpapers so that they are ready to be selected after Windows installation. ---Advanced--- Users who have more experience with Windows 7 Toolkit or experience with modifying images can use this tab, i wouldn't recommend new users to start using this until they gain a bit of confidence. Advaned: Component Removal Windows comes with features already installed, this features can be anything from Windows Media Player, Internet Explorer, Windows Media Center to more important features. The list you see here is not a full as the list from 'Component Remover' because the AIO contains a pre-defined set of features which i've manually added whilst 'Component remover' actively scans your image and lists everything including updates. I wouldn't recommend this to new users at all, and just to note that once something has been removed it can't be returned without using a fresh ISO. This tab doesn't do a full removal like vLite and uninstalls the features using DISM. Advanced: vLite Some users may instantly know what this does, this is similar to Component Removal but actually deletes files and therefore reduces the image size more significantly. It quite a new tool so there's not many items yet but i will hopefully add more as time progresses. Advanced: Files This replaces files within your image, so if for example you modify system32 files, you can import them into your image using this tool. This will most probably be used by users who have custom 3rd party theme files. Caution though as replacing an important file with a bad one can and most probably will make your ISO unbootable, so be very careful! Advanced: Services As you know Windows has many services running in the background. This part of the tool lets you reduce that and get the best performance from your computer. As you can see on the picture (below) you have to click the item in the column to change its value. You can also choose from 'BlackVipers' presets depending on what you use your computer for, you can also use the shortcut buttons on the left to do the same thing. NOTE: Services which are important are not available in the list, if you don't know anything about a service you can press the purple 'i' button on the left sidebar. Advanced: Silent Installs + SFX A lot of users like to have programs installed silently after Windows has completely installed, simply click 'Add Silent Installer' and select your EXE, you may have to go on google to find it's silent switch which is usually something like '/s /q /qn /quiet /silent' and so on. TIP: Some developers have already created silent installers so you can leave that box blank. If you have a folder full of silent installers then you can select them all and they will be added in bulk. Option: Always Install If you tick this option the the program(s) you add will be installed automatically, if it's unticked then it will ask the user what program(s) they wish to install straight after Windows installation. Option: Copy Folder Some programs such as Office have a setup.exe and then a bunch of other needed files in the same/sub-folder as the installer. Tick this option to include those files. This option is not usually needed. Advanced: Tweaks Most users will add tweaks to their install, there are literally hundreds to describe them all here but hopefully the descriptions are detailed enough for you. Just simply tick the ones you want. ---Options--- You don't really have to change these, most of them are used by me (Legolash2o) to debug issues. If you need to know what something is then just put your mouse over its name and a tooltip will appear. I will mention that the 'Prompts' items are they ones which tell you after AIO has finished what has been integrated successfully. Start OK now your ready, click start and you will be asked to enter a name, this is so you can use the same session next time you use AIO Integrator, similar to vLite/nLite last session presets. The image will automatically mount if not mounted: It will then integrate everything, green means the update has been integrated sucessfully, whilst yellow is the current item it's working on: Once done the image will save all the changes: Some drivers or language packs need to mount the boot.wim if, if it does then it will mount it now. Drivers are ususally ones for SCSI, HDD and SATA devices: Once everything has been completed it willre build the image to decrease it size so your ISO will be much smaller (hopefully). Now that everything is done, you can review what got integrated, now you can use the ISO Maker to create an ISO or just copy it to your USB device (assuming it's bootable).