_14e30a.png)
_8126ce.png)

Space Surfer
Members
-
Joined
-
Last visited
Everything posted by Space Surfer
-
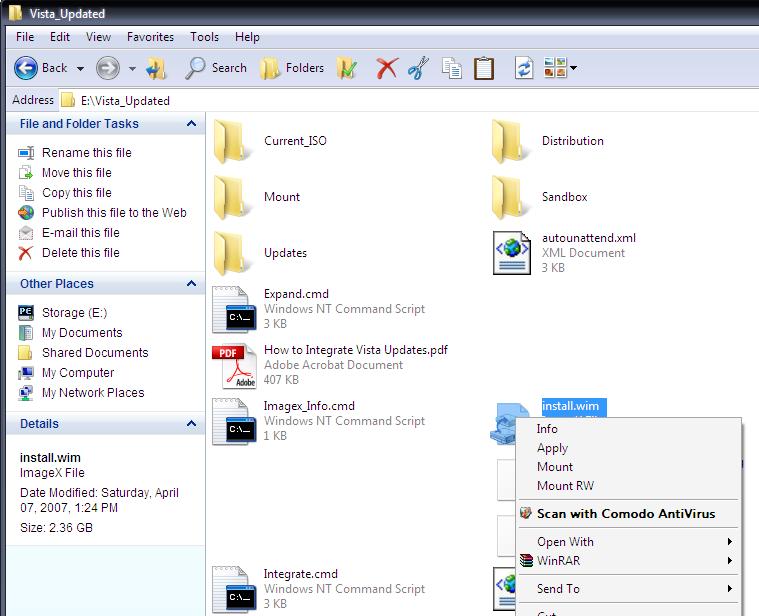
I have created a file type for ImageX files (.wim) such that when you double-click, you can get it to mount read-only, read-write automatically or to display info. Here are the registry entries that put a right-click command for Info, Mount read-only, and Mount RW. It runs the respective scripts which are available for download here: ImageX.rar You need setx.exe command for it to work. Double-click wim image for info. Right-click --> Mount to mount image as read-only. Do again to unmount. If setx variable gets messed up, option to reset variable. Right-click --> Mountrw to mount read-write. Do again to unmount and it will ask to commit or not. Right-click --> Apply to apply that image. The command script for applying comes up with this file in the source. Just fill in the rest to apply. You need to import these registry entries and modify the paths to point to the location of these command scripts. Windows Registry Editor Version 5.00 [HKEY_CLASSES_ROOT\ImageX] @="ImageX File" "EditFlags"=dword:00000000 "BrowserFlags"=dword:00000008 [HKEY_CLASSES_ROOT\ImageX\DefaultIcon] @="C:\\Program Files\\Windows AIK\\Tools\\x86\\imagex.ico,0" [HKEY_CLASSES_ROOT\ImageX\shell] @="Info" [HKEY_CLASSES_ROOT\ImageX\shell\Apply] [HKEY_CLASSES_ROOT\ImageX\shell\Apply\command] @="\"c:\\program files\\windows aik\\tools\\x86\\imagex_dapply.cmd\" \"%1\"" [HKEY_CLASSES_ROOT\ImageX\shell\Apply\ddeexec] [HKEY_CLASSES_ROOT\ImageX\shell\Apply\ddeexec\Application] @="imagex_dapply" [HKEY_CLASSES_ROOT\ImageX\shell\Apply\ddeexec\Topic] @="System" [HKEY_CLASSES_ROOT\ImageX\shell\Info] [HKEY_CLASSES_ROOT\ImageX\shell\Info\command] @="\"C:\\Program Files\\Windows AIK\\Tools\\x86\\imagex_info.cmd\" \"%1\"" [HKEY_CLASSES_ROOT\ImageX\shell\Info\ddeexec] [HKEY_CLASSES_ROOT\ImageX\shell\Info\ddeexec\Topic] @="System" [HKEY_CLASSES_ROOT\ImageX\shell\Mount] [HKEY_CLASSES_ROOT\ImageX\shell\Mount\command] @="\"C:\\Program Files\\Windows AIK\\Tools\\x86\\imagex_mountro.cmd\" \"%1\"" [HKEY_CLASSES_ROOT\ImageX\shell\Mount\ddeexec] [HKEY_CLASSES_ROOT\ImageX\shell\Mount\ddeexec\Application] @="imagex_mountro" [HKEY_CLASSES_ROOT\ImageX\shell\Mount\ddeexec\Topic] @="System" [HKEY_CLASSES_ROOT\ImageX\shell\Mount_RW] @="Mount RW" [HKEY_CLASSES_ROOT\ImageX\shell\Mount_RW\command] @="\"C:\\Program Files\\Windows AIK\\Tools\\x86\\imagex_mountrw.cmd\" \"%1\"" [HKEY_CLASSES_ROOT\ImageX\shell\Mount_RW\ddeexec] [HKEY_CLASSES_ROOT\ImageX\shell\Mount_RW\ddeexec\Application] @="imagex_mountrw" [HKEY_CLASSES_ROOT\ImageX\shell\Mount_RW\ddeexec\Topic] @="System" If you want to add "Capture" to the right-click menu of your drives so you can capture them, then add this registry key (and modify the paths of the scripts): Windows Registry Editor Version 5.00 [HKEY_CLASSES_ROOT\Drive\shell\Imagex] @="ImageX Capture" [HKEY_CLASSES_ROOT\Drive\shell\Imagex\command] @="\"C:\\Program Files\\Windows AIK\\Tools\\x86\\imagex_dcapture.cmd\" \"%1\"" Report and bugs or problems.
-
Here are my working scripts for image capture, append, and apply. These have to be in the same folder as imagex.exe. Some features: *If you include setx.exe in same folder, it will remember your filename and paths if you were to close the command prompt and reopen the script. *Menu-like interface to make it easy to see what is being captured/applied and where to. *When capturing, it you specify a WIM file that already exists, it will warn you that it will append to that image. If the file does not exist, then it will create a new one. *When applying an image, if you choose a file name that doesn't exist, it will ask you to reenter the filename. This way, you won't have to retype the whole imagex command! imagex_apply.cmd @echo off cd /d %~dp0 if not exist "imagex.exe" goto _notexist goto _main :_notexist echo. echo IMAGEX.EXE executable not found. Please ensure that IMAGEX_APPLY.CMD echo is in the same folder as IMAGEX.EXE before executing this script. echo This script will now exit. echo. pause exit :_main echo. echo. echo. echo [I M A G E X A P P L Y M A I N M E N U] echo. echo 1) Specify or change source path (the path to you .wim image file) echo Source: [%_asource%] echo. echo 2) Specify or change target path, where your image will be restored echo Target: [%_atarget%] echo. echo 3) Specify or change index you want to restore (a number, such as 2) echo Index: [%_index%] echo. if "%_asource%" == "" goto _menu1 if "%_atarget%" == "" goto _menu1 if "%_index%" == "" goto _menu1 echo 4) Apply your image now where ready echo From [%_asource%] To [%_atarget%] echo. :_menu1 echo Q) Quit. R) Reset all variables. echo. :_mainch set _ok= set /p _ok=Enter your choice: if "%_ok%" == "1" goto _getsrc if "%_ok%" == "2" goto _gettarget if "%_ok%" == "3" goto _getindex if "%_ok%" == "4" goto _apply if /I "%_ok%" == "q" goto _end if /I "%_ok%" == "r" goto _reset goto _mainch :_getsrc set _ok= echo. echo Specify location of source image to restore with full path. set /p _ok=Enter Source path: for %%A in (%_ok%) do set _ext=%%~xA if not exist %_ok% ( echo. echo --------------------------------------------------------- echo Path does not exist. Please input a valid location again. echo --------------------------------------------------------- goto _getsrc ) else ( if /I "%_ext%"==".wim" ( set _asource=%_ok% setx _asource %_ok% goto _main ) else ( echo. echo --------------------------------------------------------------- echo Error: The path "%_ok%" does not seem to be a valid .wim image file. echo --------------------------------------------------------------- goto _getsrc ) ) :_gettarget set _ok= echo. echo Specify target to install source image with full path. set /p _ok=Enter Target path: if exist "%_ok%" ( set _atarget=%_ok% setx _atarget %_ok% ) else ( echo. echo --------------------------------------------------------------- echo Error: The path "%_ok%" is not a correct location. echo --------------------------------------------------------------- goto _gettarget ) goto _main :_getindex set _ok= echo. echo Specify image index with a number set /p _ok=Enter Index number: set _index=%_ok% setx _index %_ok% goto _main :_apply echo. echo. @echo on imagex.exe /apply "%_asource%" %_index% "%_atarget%" @echo off echo. pause goto _end :_reset set _asource= set _index= set _atarget= goto _main :_end imagex_captureappend.cmd @echo off cd /d %~dp0 if not exist "imagex.exe" goto _notexist goto _main :_notexist echo. echo IMAGEX.EXE executable not found. Please ensure that imagex_capture.cmd echo is in the same folder as IMAGEX.EXE before executing this script. echo This script will now exit. echo. pause exit :_main if exist "%_ctarget%" set _append=yes if not exist "%_ctarget%" set _append=no if /i "%_append%"=="yes" set function=Append if /i "%_append%"=="no" set function=Capture echo. echo. echo [I M A G E X C A P T U R E / A P P E N D M A I N M E N U] echo. echo 1) Specify or change source path, the path you want to capture (e.g. C:\) echo Source: [%_csource%] echo. echo 2) Specify or change target image to create/append (e.g. d:\myimage.wim) if "%_append%"=="yes" echo *Image will be appended unless you specify a non-existing image file.* echo Target: [%_ctarget%] echo. echo 3) Specify or change unique description of your image (e.g. Vista Backup) echo Description: [%_descript%] echo. echo 4) Specify or change FLAG of your image (e.g. ULTIMATE) echo FLAG: [%_FLAG%] echo. echo 5) Specify or change compression type (MAXIMU, FAST, NONE) echo Compression: [%_compr%] echo. if "%_csource%" == "" goto _menu1 if "%_ctarget%" == "" goto _menu1 if "%_descript%" == "" goto _menu1 if "%_append%" == "yes" goto _skipcapture if "%_FLAG%" == "" goto _menu1 if "%_compr%" == "" goto _menu1 :_skipcapture echo 6) %function% your image now when ready echo From [%_csource%] To [%_ctarget%] echo. :_menu1 echo Q) Quit. R) Reset all variables echo. :_mainch set _ok= set /p _ok=Enter your choice: if "%_ok%" == "1" goto _getsrc if "%_ok%" == "2" goto _gettarget if "%_ok%" == "3" goto _getdescript if "%_ok%" == "4" goto _getFLAG if "%_ok%" == "5" goto _getcompr if "%_ok%" == "6" goto _capture if /I "%_ok%" == "q" goto _end if /I "%_ok%" == "r" goto _reset goto _mainch :_getsrc set _ok= echo. echo Specify location of source to capture as a .wim image. echo Usually, this would be the root of a drive, such as C:\. echo. set /p _ok=Enter Source path: if exist "%_ok%" ( setx _csource %_ok% set _csource=%_ok% ) else ( echo. echo --------------------------------------- echo Error: The path "%_ok%" does not exist. echo --------------------------------------- goto _getsrc ) goto _main :_gettarget set _ok= echo. echo Specify path and filename to store the target image, such as D:\image.wim. echo. set /p _ok=Enter Target image path: for %%A in (%_ok%) do set _ext=%%~xA && set _path=%%~dpA if /I not "%_ext%"==".wim " ( echo. echo ----------------------------------------------------- echo Error: The filename entered is not a valid .wim file. echo ----------------------------------------------------- goto _gettarget ) else ( if exist %_ok% ( set _ctarget=%_ok% setx _ctarget %_ok% set _append=yes setx _append yes goto _main ) else ( if not exist %_path% ( echo. echo ----------------------------------------------------- echo Path does not exist. Please input a valid path again. echo ----------------------------------------------------- goto _gettarget ) else ( setx _ctarget %_ok% set _ctarget=%_ok% set _append=no setx _append no goto _main ) ) ) :_getcompr set comp = echo. echo Please select compression type. echo. echo 1 for MAXIMUM echo 2 for FAST echo 3 for NONE echo. set /p type=Enter compression type: if %type%==1 set _compr=MAXIMUM&& setx _compr MAXIMUM if %type%==2 set _compr=FAST&& setx _compr FAST if %type%==3 set _compr=NONE&& setx _compr NONE goto _main :_getFLAG set _ok= echo. echo Specify image FLAG (without quotes). echo. set /p _ok=Enter FLAG: set _FLAG=%_ok% setx _FLAG %_ok% goto _main :_getdescript set _ok= echo. echo Type description of image (without quotes). echo. set /p _ok=Enter description: set _descript=%_ok% setx _descript "%_ok%" goto _main :_capture echo. if "%_append%"=="yes" goto _appendimage echo Ready to capture image from source %_csource% and store image to file echo %_ctarget% using compression type %_compr%. echo. pause echo. @echo on imagex.exe /capture "%_csource%" "%_ctarget%" "%_FLAG%" "%_descript%" /COMPRESS %_compr% @echo off pause goto _end :_appendimage echo. echo Ready to append image from source %_csource% and store image to file echo %_ctarget%. echo. pause echo. @echo on imagex.exe /append "%_csource%" "%_ctarget%" "%_descript%" @echo off pause echo. goto _end :_reset set _csource= set _ctarget= set _descript= set _compr= set _FLAG= set _append= goto _main :_end setx.exe is part of MS Support Tools Report any bugs to me. Thanks.
-
Many questions regarding making XP and Vista boot independently of each other arise because users face problems when one partition becomes corrupt or they format their active partition, not knowing they will lose the ability to boot their OS. Having independent boot would avoid this scenario. The reason they are dependent is because the boot files for both are stored on ONE and the SAME partition, which is your ACTIVE partition. Vista setup determines to put the boot files on the active partition, which is usually the XP partition since it's active at the time of install. I have come up with a way to boot the two independently with the use of a third "recovery partition." This recovery partition can be multi-purpose if you use BartPE. You can use it to boot XP and Vista, replace system files with patched ones, use disk management services to repartition, etc. (I'm sure you can also use BartPE or VistaPE but this will require adding their boot info to BCD. I do not know the bcdedit commands as of yet. Once I learn or if you know, then I can include it here. The benefit of this setup is if you hose your third partition, you can boot XP or Vista by making your XP partition active again with a BartPE CD. Requirements Three partitions. I recommend 600 - 700 MB for your third partition, in case you add other plugins/programs. Grub4Dos file called grldr. PE builder for making BartPE. System Setup There's no recommended system setup, but to give you an idea, here's my system setup. My XP partition on C:\ is the active partition, containing the boot files for Vista (C:\BOOT folder and C:\bootmgr). Vista is on D:\ and was installed from within XP. BartPE on E:\ is my recovery partition. If you haven't installed anything yet, then you may consider this setup. Instructions First, install XP to C:, Vista to D:, then BartPE to E:. Instructions for installing BartPE to a HDD partition can be found here: How to Install BartPE to Another Partition.The order in which you install doesn't matter for now. However, it is recommended to install XP first, then Vista, so you won't have to repair boot. If you are already dual-booting XP and Vista, then just install BartPE and continue. Make note which is your active partition if your setup is different. Check disk management. Remember, I'm assuming C:\ is active. [*]Boot to your recovery partition. [*]Copy Vista boot files from active partition to E:\ - Copy C:\BOOT folder to E:\ and C:\bootmgr to E:\. [*]Rename E:\bootmgr to E:\bootmgrv. (You don't have to do this if you are using BartPE, but doing this allows you to keep this one and C:\bootmgr straight; so when you create your menu.lst you know exactly which one is being used to boot Vista.) [*]Rename E:\ntldr to E:\bartpe. Note that this ntldr file should already be there and is not the same as the XP's ntldr. [*]Copy XP boot files to E:\ - Copy C:\boot.ini and C:\ntldr to E:\. [*]Rename E:\ntldr (the XP one) to E:\ntldrxp. [*]Create your menu.lst entries. See below for example. [*]Make E:\ partition the active partition. Sample menu.lst entries #Boot Vista using E:\bootmgrv title Windows Vista (bootmgrv) find --set-root /bootmgrv chainloader /bootmgrv #Boot Vista using C:\bootmgr title Windows Vista (bootmgr) find --set-root /bootmgr chainloader /bootmgr #Boot XP using E:\ntldrxp title Windows XP (ntldrxp) find --set-root /ntldrxp chainloader /ntldrxp #Boot XP using C:\ntldr title Windows XP (ntldr) find --set-root /ntldr chainloader /ntldr #Boot BartPE using E:\bartpe title BartPE (ntldr) find --set-root /bartpe chainloader /bartpe (NOTE: this is not a complete menu.lst; just the entries for items.) Reboot and grldr should load with your menu. The great thing is you can load XP/Vista with the boot files that you copied to E:\ or the ones on C:\. You can have double entries in menu.lst and both will work. If your XP partition becomes corrupt, then you can use boot files on E:\ to load Vista. You probably won't be able to load XP since its corrupt, right?? Haha. If Vista becomes corrupt, you can still load XP. If your recovery partition (BartPE) becomes corrupt, then you can load BartPE from CD, make C:\ your active and can load XP or Vista. Or you can fix your recovery partition the way it was. There are many possibilities with this. Good luck.
-
I'd have to agree with kelsen now that I've been using longer than 5 mo.... As on OS, I prefer XP. As a matter of fact, since I'm dual booting, I have stopped using Vista just cause I hate to see the Vista interface, especially Windows Explorer. What I do like about it is the new setup and deployment and being able to image it and you can install it from flash or HDD, etc.
-
Before you do BIOS update, try pointing the driver path to your BIOS cd. The driver is most likely on your BIOS CD. Point to different folders such as your chipset drivers, etc. on your BIOS CD. You can try the BIOS update, but I'm sure the driver should be on your BIOS CD somewhere.
-
Whoa! You shouldn't have put one RAM in one color and the other RAM in the other color. Bad idea. * Are you experienced in system building? I don't want to insult you by assuming you are not. If not, do you know what type of RAM you are using? * One color is most probably for DDR2 slots and the other color for DDR slots. Look at your MOBO specs. Does it support both DDR and DDR2? For example, mine does support both and Yellow is for DDR2 and Blue is for DDR. You cannot place DDR2 RAM in DDR slots and DDR RAM in DDR2 slots. * Are both RAMS from the same manufacturer? If not, then I agree with the rest of the guys here - it's probably your RAM. I had similar problems with Windows crashing with Kingston RAM. Replaced it and it works fine. If they are from the same manufacturer with the same specs, then it is still possible - it may be a faulty stick.
-
Yup, depending on your system specs, you might have to wait for the package to extract all the files. I agree, nero lite is the best. I also don't use all the crap that installs with Nero except the main nero burning program.
-
Yes, Norton Ghost (the 2003 version which works in DOS) does copy the MBR. You can have a formatted drive and apply a ghost image and Windows XP will load. Norton Ghost 2003 is the best version of Ghost. I never like the ones after this version because it requires the Recovery Console. When you say you tried to "Copy C: drive's data" you mean like xcopy or as in ghost image? Unless the PC's are identical with the same hardware, you probably wouldn't want to do that.
-
In dev manager, click on view then check "view hidden devices". See if that shows any hardware not installing properly.
-
Your updates have to be in the .msu format. This is stated in the guide but it's very easy to miss. When they are extracted, the .cab will be placed in the temp folder. I haven't seen a .doc file or .pdf of firegeier's guide. If you want to do it manually with SIM, you can follow his guide, but if you want to do it with scripts completely, then his guide is a bit hard to follow since some of his scripts are not necessary to execute, although he wants you to use them. Therefore, I had to come up with the above.
-
I've revised my original instructios to make them more clear and also added the batch files as a compressed file.
-
How to Integrate Vista Updates This guide shows you how to integrate Vista updates to the installation source, which is install.wim. Much of the credit for this guide goes to FireGeier. His site contains a lot of useful visual guides for automating Vista installations. It is found here: FireGeier's Unattended Vista Guide. Although others have used peimg.exe, official documentation from Microsoft's WAIK is lacking. Therefore, methods described here use Package Manager. The only place peimg.exe is used in this guide is to create a text file that lists the packages that were integrated. Requirements WAIK tools (imagex.exe, pkgmgr.exe, and supporting files); you should leave these files in the install folder (%programfiles%\Windows AIK\) and not copy them to another location. Run them from their original location so all dll's that are necessary are there. Vista DVD ISO extractor Although Windows XP is not required and you can do this in Vista, I had trouble mounting images in Vista. Therefore, I was working in Windows XP. Preparation Create a folder called 'Vista_Work'. You can call it anything you want. I have assigned it a variable %vpath% in my script so I'll refer to it as %vpath% from now on. Create folders in %vpath% called Mount, Sandbox, Updates, and Current_ISO. I've assigned them the variables %vmount%, %vsandbox%, and %vupdates%, respectively. Procedure Boot to the OS that has WAIK installed. If you installed it in Vista, you'll need to run these scripts in elevated mode. Extract install.wim from Vista installation DVD to %vpath%. Create script file called set_variables.cmd, integrate.cmd and expand.cmd in %vpath% from the following code or download them from the links:The script set_variables.cmd allows you to skip editing the scripts with your working folders path (%vpath%). They are automatically assigned based on the current working folder. You may have to change the tokens value in expand.cmd, if you are not using the English version. Change tokens=5 to tokens=4 if that's the case. If you are unsure, leave it and continue, as no damage is done. Only your Integrate.xml will not be properly formed. You'll determine if it is improperly formed in a later step. Download: Integration_batch_files.rar set_variables.com :: As long as all your folders are within one folder, you shouldn't have to change :: these paths since this batch file will assign the paths based on where :: set_variables.cmd is located. This script is called by expand.cmd & integrate.cmd :: Also, the Windows AIK folders are added to the path so you can run imagex, expand, :: and pkgmgr without pointing to those paths. @echo off CD /d %~dp0 SET vpath=%CD% SET vmount=%vpath%\Mount SET vupdates=%vpath%\Updates SET vsandbox=%vpath%\Sandbox SET path=%path%;C:\Program Files\Windows AIK\Tools\x86;C:\Program Files\Windows AIK\Tools\Servicing expand.cmd (courtesy of FireGeier) @echo off TITLE Vista Updates Expansion Process echo. :: As long as you are this script, integrate.cmd and expand.cmd are in the :: same folder, you will not have ot change your paths. CD /d %~dp0 call set_variables.cmd echo. echo Your vpath is %vpath%. If this is correct, continue. echo. pause :: Create an temporary to store expanded cab and xml files from msu files. IF NOT EXIST "%vupdates%\Temp" (MKDIR "%VUpdates%\Temp") DEL "%vupdates%\Temp\*.*" /q PUSHD "%vupdates%" FOR %%i IN (*) DO (Call :Extract %%i) :: Check for older file versions created by this batch and delete if exists. IF EXIST "%vupdates%\Temp\Integrate.xml" DEL /Q "%vupdates%\Temp\Integrate.xml" IF EXIST "%vupdates%\Temp\Sort.txt" DEL /Q "%vupdates%\Temp\Sort.txt" :: Create the first 3 lines of Integrate.xml ECHO ^<^?xml version="1.0" encoding="utf-8"?^>^ >>%VUpdates%\Temp\Integrate.xml ECHO ^<^unattend xmlns="urn:schemas-microsoft-com:unattend"^>^ >>%VUpdates%\Temp\Integrate.xml ECHO ^<^servicing^>^ >>%VUpdates%\Temp\Integrate.xml :: Create sort.txt which is necessary for compiling Integrate.xml. PUSHD "%vupdates%\Temp" del *.txt del WSUSSCAN.cab Dir /OD > Sort.txt For /F "Tokens=5" %%i IN ('FINDSTR ".cab" Sort.txt') DO Call :WriteXML %%i :: Create the last two lines of Integrate.xml. ECHO ^<^/servicing^>^ >>%VUpdates%\Temp\Integrate.xml ECHO ^<^/unattend^>^ >>%VUpdates%\Temp\Integrate.xml echo. echo Finished extracting MSU's and compiling Integrate.xml. echo Check Integrate.xml to see if it is well-formed before continuing echo to use Integrate.cmd to begin the integration process. echo. pause ::---------------------------------------------------------------------------- :: SUB PROCEDURES & PARTS EXECUTED OPTIONAL ::---------------------------------------------------------------------------- :: Extract subroutine extracts the msu files for the necessary cab and xml files. :Extract START "Expand" /WAIT expand.exe %1 -f:* "%vupdates%\Temp" GOTO :EOF :: WriteXML subroutine writes entries into Integrate.xml, which are specified by the name of :: coresponding cab file. This is the command line, which will call the installation of the :: cab during pkgmgr procedure later. :WriteXML IF "%1"=="WSUSSCAN.cab" Goto :EOF SET Name=%1 IF ".%Name%"=="." GOTO :EOF SET XML=%Name:~0,-4%.xml SET Cab=%Name:~0,-4%.cab ECHO ^<^package action="install"^>^ >>%vupdates%\Temp\Integrate.xml FOR /F "Tokens=*" %%i IN ('FINDSTR "assemblyIdentity" %XML%') DO (Echo %%i >>%vupdates%\Temp\Integrate.xml) ECHO ^<^source location="%vupdates%\Temp\%Cab%" /^>^ >>%VUpdates%\Temp\Integrate.xml ECHO ^<^/package^>^ >>%vupdates%\Temp\Integrate.xml :EOF Integrate.cmd @echo off TITLE Vista Updates Integration Process CD /d %~dp0 call set_variables.cmd echo. echo Your vpath is %vpath%. If this is correct, continue. echo. pause echo. echo Before beginning, please choose the version of Vista you want to update. echo. :SELECT_VER set choice= set /p choice=Choose 1 for Business, 2 for HomeBasic, 3 for HomePremium, or 4 for Ultimate: if not '%choice%'=='' set choice=%choice:~0,1% if '%choice%'=='1' goto BUS if '%choice%'=='2' goto HB if '%choice%'=='3' goto HP if '%choice%'=='4' goto ULT echo. ECHO "%choice%" invalid! Try again... ECHO. GOTO SELECT_VER :BUS SET VERSION=1 SET type=Business GOTO STEP_1 :HB SET VERSION=2 SET type=HomeBasic GOTO STEP_1 :HP SET VERSION=3 SET type=HomePremium GOTO STEP_1 :ULT SET VERSION=4 SET type=Ultimate GOTO STEP_1 :STEP_1 REM MOUNT A READ-WRITE IMAGE OF THE CHOSEN VISTA VERSION imagex.exe /mountrw "%vpath%\install.wim" %VERSION% "%vmount%" ECHO. ECHO Press any key to begin integration of updates. Once you start the process. echo you should not cancel it. Make sure you are ready before continuing. echo. PAUSE echo Starting integration. This can take several minutes. Please wait until it finishes. echo on START "Starting Package Manager" /WAIT pkgmgr.exe /o:"%vmount%;%vmount%\Windows" /n:"%vupdates%\Temp\Integrate.xml" /s:"%vsandbox%" /l:"%vpath%\integrate.txt" echo. echo The errorlevel is: %errorlevel%. echo. echo An errorlevel of 0 indicates successful integration. Press any key to save a echo list of installed packages to a text file. ECHO. pause echo off peimg.exe /list /image="%vmount%\Windows" >> "%vpath%\Current_ISO\updates_installed_%version%_%type%.txt" echo. echo The Sandbox folder should be cleared whether integration was successful or not. echo. pause REM Delete, then recreate the folder rd "%vsandbox%" /s /q mkdir "%vsandbox%" echo. echo Now, we are ready to commit changes and unmount. Selection an option to echo unmount while committing or not committing changes. echo. echo Once you commit, the process can take several minutes as the changes are echo saved to your installation source. ECHO. :SELECT_COMMIT set choice= set /p choice=Choose Y to commit changes. Choose N to abandon changes: if not '%choice%'=='' set choice=%choice:~0,1% if '%choice%'=='Y' goto COMMIT if '%choice%'=='y' goto COMMIT if '%choice%'=='N' goto ABANDON if '%choice%'=='n' goto ABANDON echo. ECHO "%choice%" invalid! Try again... ECHO. GOTO SELECT_COMMIT :COMMIT imagex.exe /unmount /commit "%vmount%" goto END :ABANDON imagex.exe /unmount "%vmount%" goto end :END echo. echo Done. Press any key to exit. echo. Pause [*]Copy all of your MSU updates to the %vupdates% folder. [*]Execute expand.cmd. Expand.cmd will extract the .cab and .xml files from the .msu files in a temporary folder called Temp in %vupdates%. It also compiles a file called Integrate.xml, a necessary file for integration. Note: do not change the spacing in expand.cmd. Some spaces are necessary to build a proper structure for Integrate.xml. [*]Examine this file (Integrate.xml) using Notepad. It should have as many entries as there are updates of the following nature: Integrate.xml sample (partial) <?xml version="1.0" encoding="utf-8"?> <unattend xmlns="urn:schemas-microsoft-com:unattend"> <servicing> <package action="install"> <assemblyIdentity name="Package_for_KB928089" version="6.0.1.1" language="neutral" processorArchitecture="x86" publicKeyToken="xxxxxxxxxxxxxxx"/> <source location="E:\Vista_Work\Updates\Temp\Windows6.0-KB928089-x86.cab" /> </package> ... and so on If your file is bare, you may need to change tokens=5 to tokens=4 in expand.cmd. [*]Execute integrate.cmd once you determine your xml is good. It will prompt you through the steps. Note that if you were successful, you should get an errorlevel of 0. The script will also create a file called Updates_Installed_%#%_%type%.txt, where # and type correspond to the Vista version number (1 to 4) and type (Business, Home Basic, Home Premium, or Ultimate), respectively. This is only for the purpose of auto-generating a text file that shows all the updates. The official way of checking integrated updates is described in step 8. NOTE: You will have to install updates to each version of Vista separately. So, you can repeat integrate.cmd for each version by running integrate.cmd and choosing to mount a different version. NOTE: You don't have to repeat expand.cmd for each version, only integrate.cmd. The script empties the Sandbox folder automatically but does not delete the cab files that are expanded in Temp folder. You can manually delete the cab files later if you prefer. [*]Start WSIM and open your updated install.wim. If you are asked to create a new catalog file as the current one is missing or outdated, go ahead and create a new catalog file. You will see your packages automatically assigned as either hotfixes, updates, or security updates in the directory structure of Packages. NOTE: This is the official method to check whether your packages were installed. We used peimg only to make a text file that does that automatically for step 9. You'll have to create a new catalog file for each version of Vista if you want to update it in your ISO. [*]Inject install.wim back into the ISO if you committed changes to finish the process. You may also inject updates_installed_#_type.txt if you want to know which updates are contained in the ISO image. You can also use Microsoft's utility to rebuild the bootable ISO but that involves extracting ALL the files from the DVD, not just install.wim. Therefore, it's easier to use an ISO utility than Microsoft's utility. Injecting the catalog file is options as it is not used by setup.
-
You'll like it for a week. Then you'll find all the annoyances. I thought it was great, and it is, but I've found some very annoying features missing or bugs, etc. MS released it too quickly, without fixing all the bugs.
-
Humm, type notepad.exe c:\filename.txt and you'll see "Search" functions as Run box. Replace filename.txt with any file on your drive. Therefore, it's not necessary to bring back Run in start menu, since Search functions as both Search and Run. This works for me anyway.
-
Humble request for Mods to pin if you think it's worthy. Good news for people who use Grub loader for multi-booting to various Microsoft OSes, including the new Windows Vista, and Linux. I
-
Correct. Instead of the progress bar, you get a visual boot screen that is not animated. I rather prefer the progress bar because if you run chkdsk during boot up and you have replaced the progress bar with a visual boot screen, you won't see the progress of the chkdsk... at least for me it didn't show.
-
Note that installing Vista from within Windows will load Vista boot files on your XP partition, which is probably your active partition since you are running XP. The active partition is alway the partition that stores the boot files for MS OSes. The system partition is the partition that the current OS resides on. So if Vista OS is on V: (the system partition) and Vista boot files are on C: (active partition) and you format C:\ you won't be able to boot to Vista. You'll need a Vista boot floppy. Here's how to create one just in case you ever have boot problems: Vista Boot Disk. Installing Vista by booting from DVD, however, will make the partition that you're installing to the active partition and the boot files will go there. Just something to think about.
-
Or you could type msconfig in the search box. Search also functions as the new Run box.
-
Yup, Windows Mail in Vista no longer supports checking your Hotmail account. I used to be able to check my Hotmail account in Windows XP Outlook Express. I had to switch to Gmail, which is the only one that offers checking your mail from an email client. As was mentioned, Yahoo charges and Hotmail doesn't even allow it. You can use a free program called Windows Mail Live Desktop, which is in beta right now that will let you check Hotmail email. It has advertisements though. You can also use Outlook (not express) to check your hotmail email. However, Outlook Express is superior with Hotmail than Outlook.