


compstuff
-
Posts
564 -
Joined
-
Last visited
-
Days Won
6
Content Type
Profiles
Forums
Events
Posts posted by compstuff
-
-
Currently I don't use setupcompete at all.. I install everything via SFX/Silent installers but I realize after seeing wiktorynka's method that I am basically doing the same thing just using "calls" from SFX and and install folder in my $OEM$ I'm not sure if there is a benefit doing it one way over the other.
-
Add this info to Moom's and you have a superb overview for everyone to easily understand the whole concept
Yes, McRip offers both with no need to visit special MS links or have to order special hotfixes from MS. He's done that already for you.
As far as which branch to use, it's really a matter of person preference. Some prefer the GDR branch as there are fewer updates to integrate and they are slightly more stable, though they are not immune to issues. Others figure that all of the LDR/QFE updates will eventually be rolled into the GDR branch anyway, or the next SP if there ever is one, so you might as well be prepared. While there is a very small risk that new bugs are introduced, the cases where that has occurred are rare and they are usually corrected quickly with yet another update. LOL I personally have not run into a problem using the LDR/QFE branch and I think it is what Lego uses himself.
Cheers and Regards -
I think that's THE most concise explanation I have read to date on the issue... excellent!!! That should be a sticky somewhere for reference.
Yes.
LDR/QFE updates ( Limited Distribution Release and Quick Fix Engineering ) are on an an other "branch" of development.
Think of it as "testing": you have the latest fixes, but also potentially new bugs or regressions.
GDR means General Distribution Release.released to the public on Windows Update and other places.
When fixes of QFE/LDR are considered stable, they are merged in GDR branch. (the "stable" version )
The KB posted on Windows Update contains the two branches, so once you have installed QFE/LDR hotfixes, you're staying on this branch. (until the next service pack or if you uninstall any updates on LDR/QFE branch).
That is pretty much it ...
-
I eliminated this as a possibility by naming my folders "a" and "b" and the 3 updates I used as "1", "2" and "3" and the placed them all in the root of the drive. They still failed and the ToolKit just did nothing and I had to force close the process using task manager and then discard the image.
I noticed you have a "bang" (!) in the path: I would NOT use special characters in the path; I got problems with special (german) characters).
-
I have the same update going red in the stable 1.4.1.14 and the latest test build .15
I don't have a lot of old versions but WinToolkit 140-77 installs this ActiveX cab fine
EDIT: Rica, if you read this you may want to remove the "Solved" from the subject line
-
Its my understanding that the installers run 1st and the setupcomplete.cmd after
-
Thanks... I was beginning to think it was me... plus I'm having one of those days where nothing seems to be working right for me :dizzy:
@compstuff - I had the same problem with test 15. WinToolKit appeared to stop right at the first update (it did not matter which one it was) and then it just stopped. I let it set for an hour (multiple times), and it still did not go anywhere. I had to use the latest stable version to get the integration done. Stopping the integration also did not happen either.
-
I just tried a brand new integration using Test 15 and I got the same failure... here is my .ini
EDIT: Using the same .ini with 14.1.14 works just fine
Well I said earlier I decided to I would try the latest versions so I wanted to take my previous integrated image that had only updates added and add 3 more that MS update showed but when I tried to add them it just keeps running and running and never completes... all I see is the image below:
EDIT: I tried to cancel it and that doesn't seem to work either it hasn't stopped after almost 15 minutes... I guess I will reboot
-
Would it be possible to ad the ability to download the WU_Satisfy folder and use the Update Catalog Filter to manage it. This is actually an important folder. Thanks
-
Thanks for the info you saved me some testing time
Hard links (or symbolic links) don't work. I already tried that for a separate project. DISM will map the absolute path, not the path of the symbolic link.
For deleting duplicate files, you'd be better served scanning/deleting duplicate .inf files only. Then scanning the folders for any folder that doesn't contain a .inf and deleting that "empty" folder.
Some .inf files have dependent files mapped in such a way that even deleting a file that doesn't apply to the OS at all will still break the driver package as a whole.
A good example of this is the driver in DP_Audio_wnt6-x86_1207\x86\S\RME\1\.
There is only one .inf. Inside it references hdsp_64.sys as mandatory, even on a 32-bit system where it would be ignored. But if you remove that 64-bit file, you break the whole driver and it will refuse to install.
-
does this help?
http://www.wincert.net/forum/topic/10955-my-personal-image-integration-process/?p=95402
sorry but i m very noob! how i can install update? via gdr...but how?
-
I never test my driver integrations in a VM ...I only use real hardware for that... I use VM's for everything else
-
I never thought about the hard link concept before... since I also leave "partial" folders in place after I remove the duplicate drivers this seems like a great idea even though I don't actually "fully" understand the way DISM works driver integration. This leads me to ask a larger question; if we incorporate a SAD2 method into our driver integration, other than size and speed, what difference does having duplicate drivers actually make? DISM addresses this doesn't? It's doesn't cause problems does it? If it doesn't actually cause problems I am wondering if I am just over complicating things for myself.
With that said I am going to try Duplicate Commander this weekend
I guess that assumes that the incomplete driver folders can automatically find the surviving file/folder somehow? Ideally, I would think it would be better if the duplicate files could be replaced by a hard link to the surviving files. They might still show up as duplicates, but they wouldn't take up any real space on your disk.
I know there used to be a "duplicate file finder" type app that had that as an option of what to do with duplicates, but I can't remember which app that was and so can't put my finger on it. If I ever find it again I'll post about it.Possible options I found are:
Duplicate Commander - Freeware - Info on main page, also available as portable versionTreeSize Pro - Commercial software with Trialware - US$52.95 - InfoCheers and Regards
-
I haven't done updates in the last few days because I am working on my projects but I definitely download the Update Changelog.tx every time I did my updates. Do you have the update catalog filter turned off?
I have all of my updates backed up prior. I simply copied them over to v1.4.1.14 (and v1.4.1.15_T15) and when I tried checking for any new updates it sorted some of the wrong files in the old folder. Another example is to check McRip's two servers and compare what he has versus what Win Toolkit download. Update Changelog.txt isn't downloaded, for example.
Windows 7 Updates: http://hotfix2.cesidian.info/
Windows 8 Updates: http://win8.cesidian.info/
-
I'm sorry I over looked that aspect in your images and post... I have a lot of work stuff going on and I am trying to figure out how to explain my Step 2 in my other post lol
I actually do delete the non relevant OS folders and I only leave the ALL and the WIN7 ...as I get a little more off my plate I will provide my examples as well for everyone's review.
On a side note I hope this whole issue/topic renews support for the DriverPack forum and creation of packs (meaning more people helping to make the packs). I have definitely not been as active as I should...
I just want to bring something to your attention that I've only just realized before you try my method. Mr_Smartepants and mooms have pointed out to me that It may be wise to remove non-releavant OS folders first, prior to scanning for duplicates. The reasons can be clearly seen in posts #20, #22, and #23.
-
I know exactly what you mean and I have wondered the same thing but I have been successful it deleting the partial aspects of folders and creating fully functional images BUT I really think we are all on an excellent track to make a huge impact in driver integration so I am revisiting my entire method and will experiment with everyone's ideas and input
I think it is dangerous to delete duplicate files, because sometimes they are (or seems at least) necessary.
I have tested DFF in DP_LAN_wnt6-x64_1208 after deleting others OS folders (left Win7 and All): it found some duplicated files in some folders, but the others files in the same folders are not duplicates ! (they are indeed same files but belongs to another "sets" of drivers)
So if we delete one each of the files, we are left with "incompletes" folders and I think the drivers can't be installed.
I don't know if it's clear, rather see the image to understand what I'm saying:

-
As verified v1.4.0.77 can't be used for this any longer so how are you verifying that this problem still exists?
Refer to my previous post. v1.4.0.77 grabs the entire update list correctly from McRip's server. Every version after that has incorrectly marked some of the files as being older and put them in the old folder. The best way to describe this is to download all of McRip's files from Win Toolkit v1.4.0 [stable] v1.4.0.77 and then transfer them over to the v1.4.1.14 folder. The one issue right now is that McRip has changed his server so v1.4.0.77 doesn't detect it.
-
Step 2 is much more complicated to explain since I need to explain some tools I use as well... so it will take me a while and many edits I but I will get it done... and then I hope my method of using the KUC will be helpful since it is a little unique but that should be easy to explain
Adding my 2cents - this is very useful for someone like me who is new to using this tool. I am building my first images and went through your Step-1 process and have been waiting for step 2
No pressure though, I installed my image and will be playing around for a while before I build a new one. Just wanted to say thanks!
-
I did know your's was there so no worries but I do appreciate it... I just know I can ramble sometimes and doing something like this is rather new to me
My thanks went without saying, but it shouldn't have. Many Thanks compstuff!
Cheers and Regards
-
Step 2 SFX/Silent Installers
If you have been following this then some steps will now become repetitive which is good because that's whats makes some of this rather straight forward to me. Hopefully you will also be able to follow my folder logic so I can just go directly to the folders we will use.
This step may be a little more complicated for me to explain but I will try my best and I think I will start with my reasons for doing it in this manner. I really prefer to separate and control all the items that I add as silent installers etc and RunOnceEx item and run them in a single process. I also try to create a method that allows me to make easy updates to files when they become available and then just drop a file in place, re-run this step (which takes about 10 minutes) and then my image is up to date. Other supportive scenarios would be how easy this step is to maintain for the next full integration by reusing my .ini file because I have used generic names for the files or the fact that most files don't change at all. Lastly I can use generic calls to batch files or scripts to install files from my $OEM$ folder which works great when I want something for one client versus another or to create a "admin" image with lots of different tools for myself. If this is not clear don't worry, I have a lot more explaining to do.
NOTE: I can't explain every single item that is added, it would take too long and is really not the scope of this, but each item will be fully referenced so you can research them yourself
Lets start with the easy stuff:
Setting up the new target image for this step I am working in my _Slipstream\_7Builds\ folder. I copy the completed Step 1 Integration to the Step-2-SFX folder. We will copy my $OEM$ folder and my Autounattend.xml later so just keep that in mind. (Refer to previous pics)
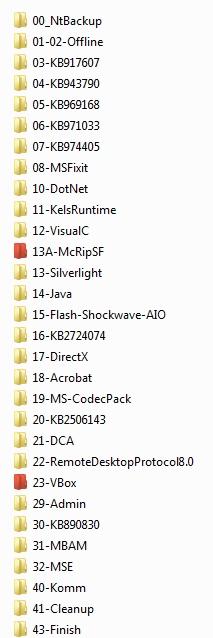
Now lets take a look at the !Slipstream\_7Tools\_Step-2 folder since this and the $OEM$ are the brains of all of this:
OK now I am sure this may look like soo much to maintain but I swear other than a few files, I basically set all this up once and pretty much never changed it and I have been using this forever... and remember if I never really change the files or file names then the .ini can be reused :-)
So lets look at items 00 to 07, these are items that can't be installed in Step 1 so they get installed to an online image. I obtained all of these from McRip and I just manage them this particular way. I can reuse the same .ini content for this:
NOTE: reading the .ini file will show what actual files are in what folders... I literally did these when I first started so I need to help myself understand what things were for
KB974150-x64::;NO;792.74 KB;E:\!Slipstream\_7Tools\_Step-2\00_NtBackup\KB974150-x64.msu;Always InstalledKB974674-x64::;NO;668.16 KB;E:\!Slipstream\_7Tools\_Step-2\00_NtBackup\KB974674-x64.msu;Always InstalledKB2533552x64::N/A (Not Needed);NO;9.23 MB;E:\!Slipstream\_7Tools\_Step-2\01-02-Offline\01-KB2533552\KB2533552x64.msu;Always InstalledKB2603229x64::N/A (Not Needed);NO;193.42 KB;E:\!Slipstream\_7Tools\_Step-2\01-02-Offline\02-KB2603229\KB2603229x64.msu;Always Installedhelp::N/A (Not Needed);NO;701.34 KB;E:\!Slipstream\_7Tools\_Step-2\03-KB917607\help.msu;Always Installedfmapi::N/A (Not Needed);NO;237.99 KB;E:\!Slipstream\_7Tools\_Step-2\04-KB943790\fmapi.msu;Always Installedagent::N/A (Not Needed);NO;2.65 MB;E:\!Slipstream\_7Tools\_Step-2\05-KB969168\agent.msu;Always Installedactivation::N/A (Not Needed);NO;1.35 MB;E:\!Slipstream\_7Tools\_Step-2\06-KB971033\activation.msu;Always Installedidentity::N/A (Not Needed);NO;1.47 MB;E:\!Slipstream\_7Tools\_Step-2\07-KB974405\identity.msu;Always InstalledidentityHF2::N/A (Not Needed);NO;2.75 MB;E:\!Slipstream\_7Tools\_Step-2\07-KB974405\identityHF2.msu;Always Installed
08-MSFixit contains the following fixes:
Some of these I got from McRip and some I got from my own research. I believe McRip still has his own installer for these but I also think I added some additional items which is why I handle this using my method
MicrosoftFixit50470.msi:: _Step-2\08-MSFixit\MicrosoftFixit50470.msiMicrosoftFixit50531.msi:: _Step-2\08-MSFixit\MicrosoftFixit50531.msiMicrosoftFixit50688.msi:: _Step-2\08-MSFixit\MicrosoftFixit50688.msiMicrosoftFixit50848_KB2665946:: _Step-2\08-MSFixit\MicrosoftFixit50848_KB2665946.msiMicrosoftFixit50877.msi:: _Step-2\08-MSFixit\MicrosoftFixit50877.msiMicrosoftFixit50897.msi:: _Step-2\08-MSFixit\MicrosoftFixit50897.msiMicrosoftFixit50907.msi:: _Step-2\08-MSFixit\MicrosoftFixit50907.msiMicrosoftFixit50908.msi:: _Step-2\08-MSFixit\MicrosoftFixit50908.msiMicrosoftFixit50939.msi:: _Step-2\08-MSFixit\MicrosoftFixit50939.msiWhen and if I determine I need another fix I can just add it to this folder and use a simple method to get the correct syntax and entry. Just mount an image, go to the advanced tab, SFX silent installs, add the single new fix, and then create and save a new temp .ini file ...then just open the temp .ini file and copy and past the entry into you real working .ini (I hope that makes sense). It literally takes about 5 minutes and I have only had to change this directory and .ini portion once so farMicrosoftFixit50470::/quiet /norestart;NO;638.00 KB;E:\!Slipstream\_7Tools\_Step-2\08-MSFixit\MicrosoftFixit50470.msi;Always InstalledMicrosoftFixit50531::/quiet /norestart;NO;646.50 KB;E:\!Slipstream\_7Tools\_Step-2\08-MSFixit\MicrosoftFixit50531.msi;Always InstalledMicrosoftFixit50688::/quiet /norestart;NO;655.50 KB;E:\!Slipstream\_7Tools\_Step-2\08-MSFixit\MicrosoftFixit50688.msi;Always InstalledMicrosoftFixit50848_KB2665946::/quiet /norestart;NO;964.00 KB;E:\!Slipstream\_7Tools\_Step-2\08-MSFixit\MicrosoftFixit50848_KB2665946.msi;Always InstalledMicrosoftFixit50877::/quiet /norestart;NO;1.00 MB;E:\!Slipstream\_7Tools\_Step-2\08-MSFixit\MicrosoftFixit50877.msi;Always InstalledMicrosoftFixit50897::/quiet /norestart;NO;1.12 MB;E:\!Slipstream\_7Tools\_Step-2\08-MSFixit\MicrosoftFixit50897.msi;Always InstalledMicrosoftFixit50907::/quiet /norestart;NO;961.50 KB;E:\!Slipstream\_7Tools\_Step-2\08-MSFixit\MicrosoftFixit50907.msi;Always InstalledMicrosoftFixit50908::/quiet /norestart;NO;965.00 KB;E:\!Slipstream\_7Tools\_Step-2\08-MSFixit\MicrosoftFixit50908.msi;Always InstalledMicrosoftFixit50939::/quiet /norestart;NO;1.03 MB;E:\!Slipstream\_7Tools\_Step-2\08-MSFixit\MicrosoftFixit50939.msi;Always Installed
10-DotNet
I personally always use Ricktendo's .net installers and this is a great example of and easy to maintain folder item. Rick releases a new version, I copy it to the folder, rename it and I'm good to go with no other changes to anything.
dotNetFx45::/ai;NO;46.04 MB;E:\!Slipstream\_7Tools\_Step-2\10-DotNet\dotNetFx45.exe;Always Installed
NOTES:
Rick's installer has the following switches I choose and I just the /ai
/y - Passive mode, shows progress bar advancing but requires no user interaction. *Full* package is installed./ai - Quiet mode, no user input required or output shown. *Full* package is installed./ain - Quiet mode, no user input required or output shown. *Full* package is installed and 'ngen executequeueditems' is also run./h | /? - Display this help.Mr_SmartePants has an excellent method of creating your own .net installer I just choose to use Rick's*************************TO BE CONTINUED HEADING OFF TO WORK********************************** -
Are you actually looking at McRip's server and seeing files that are there but have been moved into your "old" directory? Could you provide current examples? I'm just not seeing this happen to me but want to make sure.
-
DotFusion... love the tools our logic and methodology was the same but yours seems really slick... I am trying it with my next set thanks
-
I was beginning to wonder if this was actually useful so thank you for the acknowledgement.I will be doing STEP 2 as soon as possible just a little tied up with work now.
Thanks for sharing your knowledge. This will help us a lot!
:prop:
-
I am holding off commenting too much on this because I am about to re-visit my driver integration method but I also use WIN7 and ALL in the driverpacks and delete duplicates and recompile. I would also like to know your method of doing this DotFusion to see if we are similar.


[Question] WinToolkitRunOnce.exe and Setupcomplete.cmd
in Win Toolkit
Posted
I integrate KB2533552x64 using the ToolKit and add it as an SFX and I have never had a problem:
KB2533552x64::N/A (Not Needed);NO;9.23 MB;E:\!Slipstream\_7Tools\_Step-2\01-02-Offline\01-KB