_14e30a.png)
_8126ce.png)

Legolash2o
Contributors
-
Joined
-
Last visited
Everything posted by Legolash2o
-
Hopefully the alpha build with error logging will find the issue Can you please open your image with WIM Registry Editor, load 'Software', export HKLM\\WIM_Software\\W7T key and send me it please? and also take a print screen of your dvd/usb root?
-
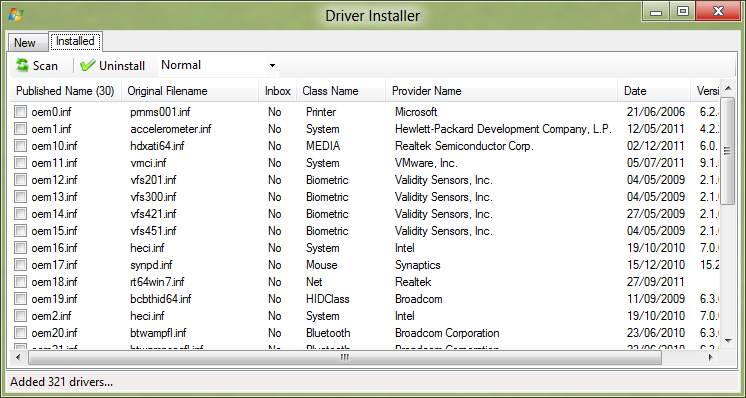
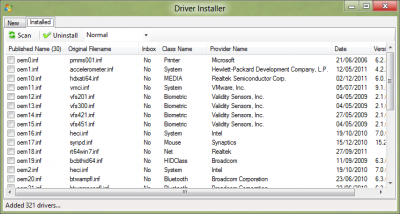
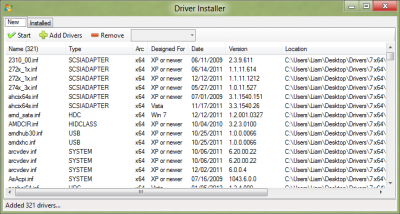
The 'Driver Installer' lets you install any driver either from driver packs or you just have an updated driver to the computer currently installed (Live). Installing Drivers Step 1: Select the folder your drivers are in Use the 'Add Drivers' to select the folder which contains your drivers *.inf files Note: *.inf files with the same MD5 will not be added, this avoids installing the same driver. Step 2: Click Start Once your files have been added, click 'Start' and W7T will start installing the drivers on your computer. Step 3: Wait Wait may take some time to install all the drivers, so go for coffee, cup of tea or whatever you prefer. W7T will let you know when it's done. Uninstalling Drivers Step 1: Press the scan button This will check which drivers are already installed via on your live system. Step 2: Select the drivers you want to remove Tick the boxes next to the drivers your want to remove. Step 3: Press 'Uninstall' and wait Now all you have to do is sit back and wait for those obsolete drivers to be removed, W7T will update the list once completed.
-
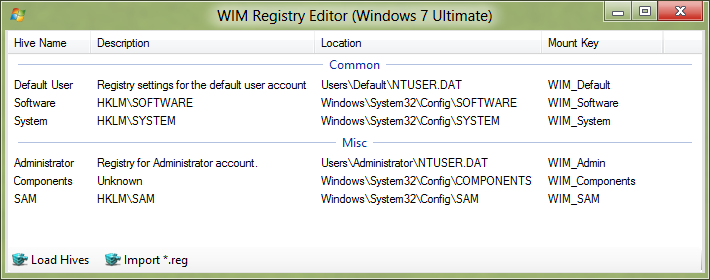
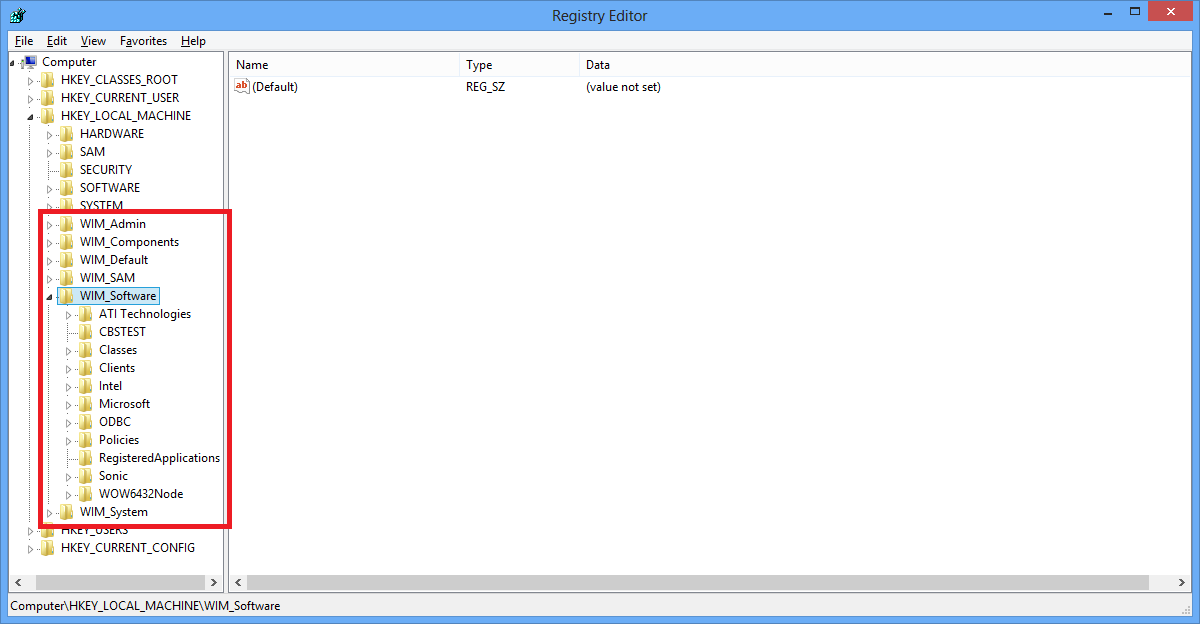
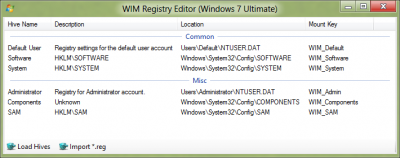
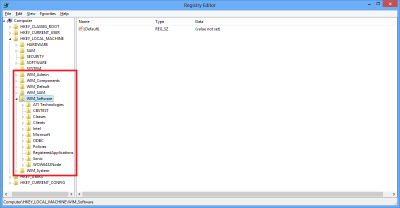
This tool lets you edit the registry of a selected image and i only recommend this tool for advanced users who have experience with the registry, so on that note... WARNING: This tool is for ADVANCED users only! As usual when working with images you will be asked to select the image you wish to work with, above i used a previously mounted image. Once you have selected the image you wish to work with then go ahead and click next. NOTE: If you can't see any images in the list then click 'Browse' first and select your install.wim Load Hive Once done, you should see a screen like above. Select the registry items you wish to edit and click Load Hives and the regedit window should open. Importing You can click Import which will convert a registry file (*.reg) and Win Toolkit will automatically convert and import it for you. Unload Hive You can use this to unmount that registry hive when you no longer needed it, note though that it will do it automatically for you anyway when you try and close the tool. Once done, close the tool and you should get a prompt asking you to save or discard the changes to the image. The rebuild option seems pointless if this is the only thing you have done to the image. Accessing the registry Open the registry as usual (WinKey + R > "regedit") and you should see something like the picture below:
-
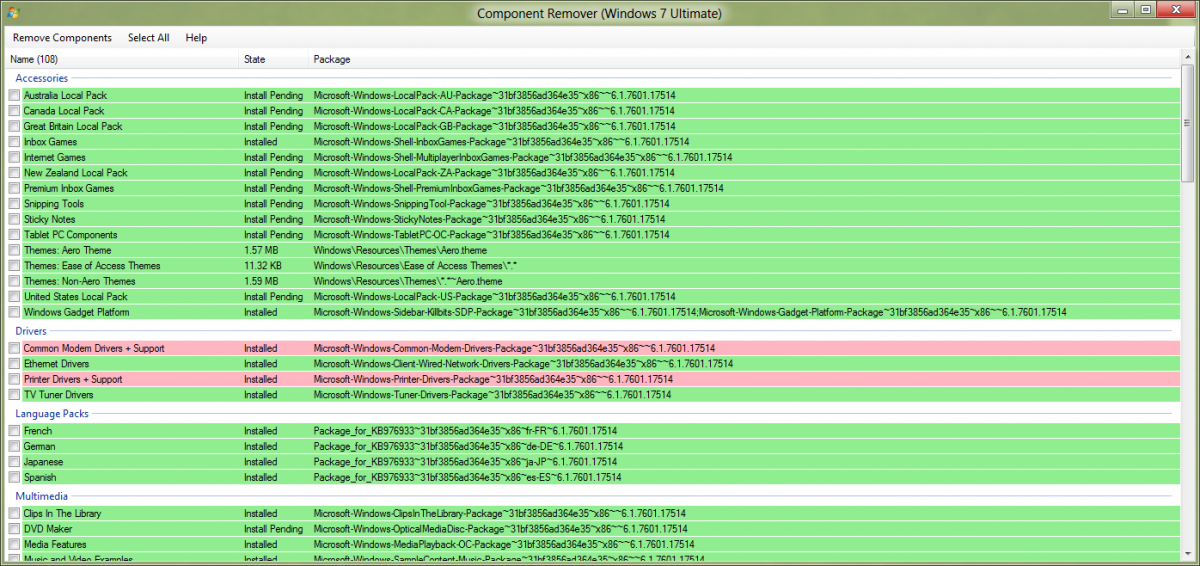
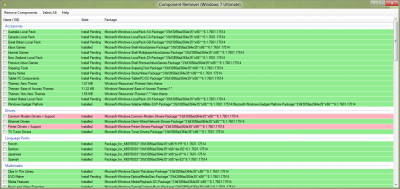
This tool lets you remove built-in Windows packages from your image, for example Windows Media Player, Windows Media Center or Internet Explorer. The difference between this and vLite is that this tool uninstalls them the official way rather than remove files the downside is that the image does not shrink as much as just removing the files. It also lets you remove old updates. WARNING: Anything you remove using this tool can't be undone, it is permanent! Step 1: When you first open up this tool you will be asked to select the image you wish to work with. Click 'Browse' and select the install.wim you wish to work with and then either click on the item Windows version you want and press select or just double click. Once done, the image will start to mount and retrieve all available packages within the image, it will not show ones which have already been removed. Note: You may notice that this list has more than the list available in 'All-In-One Integrator', this is because in the AIO i have only included the basics, whilst Component Remover will include everything, including updates. Step 2: Select the items you want to remove Once all the items have been listed, you can select the components you wish to remove. Green: Safe to remove. Yellow: Unknown, be careful removing these Red:This will break something, something depends on this feature but it will hopefully say what it is. Step 3: Begin Once you have everything selected, you can now click 'Remove Components', once done it will rescan and shows you what's left in the image. Step 4: Save Once done, you can go ahead and close the tool, click 'Yes' and it will ask you if you want to save the image, i recommend you to 'Save & Rebuild', however if you are going to be working on more than one image then just rebuild once you're done with your last image.

-
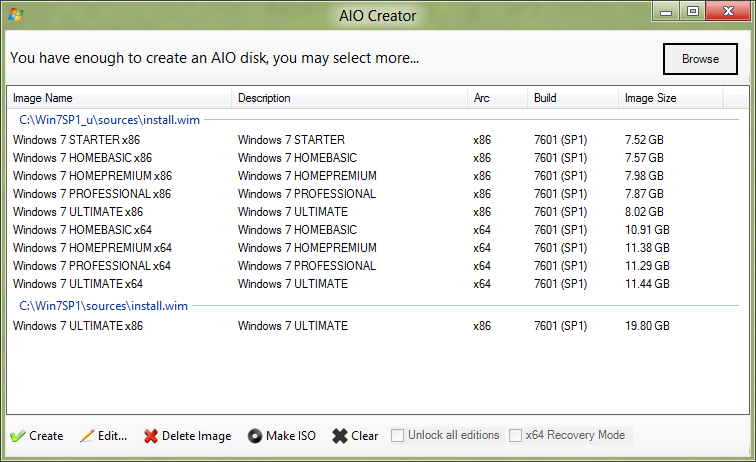
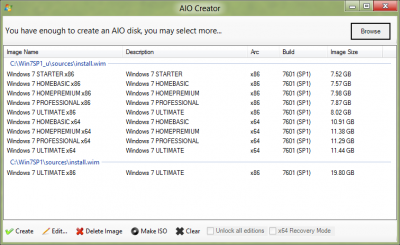
The 'All-In-One Disk Creator' lets you create all in one disks, so for example you can have Windows 7 SP1 x86 and Windows 7 SP1 x64 in disk, you could further include Vista or 2008 server if you wished. Step 1: Select your first image. Press the 'Browse' button and select your first install.wim, you should then see all the images get lists Step 2: Select your second image Press the 'Browse' button again and select your second image, you should now see even more images added. Optional 1: Add more images You can keep hitting browse and add more and more images until your ready. Optional 2: Delete the images you dont want! Step 3: Press Create W7T will then merge all of the images together, it will also try the best it can to resolve name conflicts however you may have to use the 'Edit' button and change some names to that NONE of them are the same, don't worry about descriptions, they won't conflict. WARNING: It is really important that none of the images have the same name, W7T will try for example add 'x64' or 'x86' to the names of the images to remove conflicts, however sometimes this is not enough. Optional: Rebuild You can choose to rebuild your newly created image so that it can produce a smaller ISO. Optional: ISO Maker Self-explanatory, make a new ISO with your new creation. Options Unlock All Editions Usually an image is locked to one edition i.e. Ultimate, so when it comes to install you don't have the option of choosing. Unlocking them will ask you which version of Windows you wish to install after booting from the ISO/USB. x64 Recovery Mode This will copy the 64bit Recovery Mode files, so if something happens to your computer and it's 64bit, you can use this option.
-
 Links to the SP1 Disks are below. The 'Download' button above has the Service Pack 1 documentation. http://www.microsoft.com/en-us/software-recovery Please do not message me to ask if i have an ISO in your language, i don't have any links for them. If i did then i would of added them in here. You can always integrate your language into these ISO's if you can't find your language. Do not under any circumstances ask for serials, cracks or anything that will break the forum rules.
- 40 comments
- 64 reviews
-
-

-

- 7
-
-
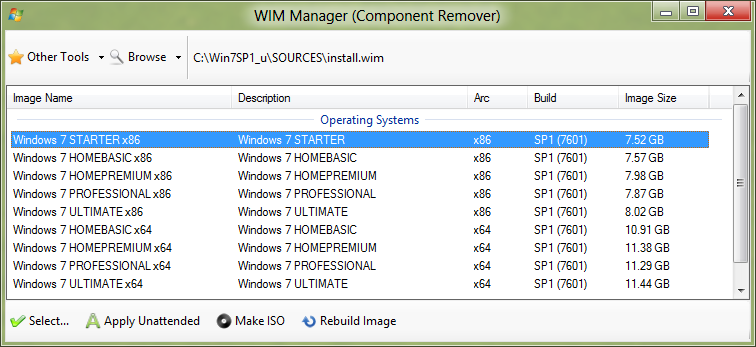
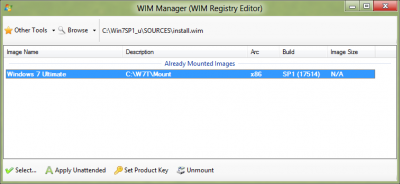
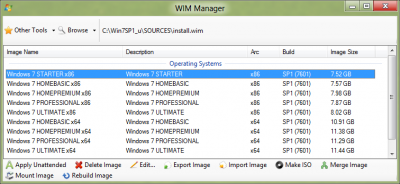
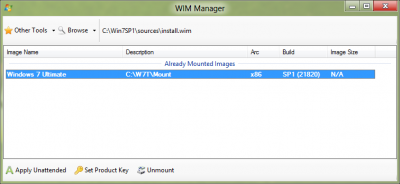
You can think of WIM Manager as a GUI version of DISM/Imagex. You can rename, mount, unmount, delete, import, export, integrate unattended file, and so on... NOTE: If you plan you on integrating stuff you don't have to mount it via this tool first, you can just go straight to All-In-One Tool. 1. You will probably see an empty list unless you have select an image before, if it's empty then go to 'Browse' and select the following option: a) If you have extracted an ISO or copied the DVD onto your HDD then select the 'extracted DVD' solution and select the folder root (not the 'sources' folder itself but the folder before that). i.e. C:\\Win7SP1\\ Select a specific wim. Useful if you want to select the boot.wim or if you just have the install.wim without the other DVD contents. OK, once done, you should see a list of images and a bunch of options. Apply Unattended If you created an unattended file then you can integrate it here, just simply select your unattended file. Delete Image This will literally delete the image from the install.wim, it is recommended to rebuild the image after you have delete all of the images you needed to delete, but you can rebuild just before you close WIM Manager (so you only rebuild once). Edit This lets you edit the name and/or description of the selected image. Export This lets you export the select image to its own *.wim file, can come in handy. Import This lets you capture a new image to add to the currently selected install.wim. This uses the 'Capture Image' tool. Make ISO Makes your selected DVD/Folder into a bootable DVD! Merge Image This lets you merge another *.wim into your selected install.wim, for example you can add your Vista into your selected Windows 7 image to create an All-In-One. Mount Image Self-explanatory, lets you mount the image. Rebuild Image This is probably the most handy feature, if you have made loads of edits to your image like integrate updates, delete files, then i recommend you do this as it will decrease the size of your install.wim which makes your ISO smaller. Already Mounted Image If you have an image already mounted it will be displayed like this. You can actually switch to the All-In-One Integrator and select this image to work with. Set Product Key This uses DISM to set a product key for the image. Unmount Unmounts the image, asking you if you want to save or discard changes. Other Tools This lets you switch between tools and save you from going back to the Tools Manager and selecting the new tool.
-
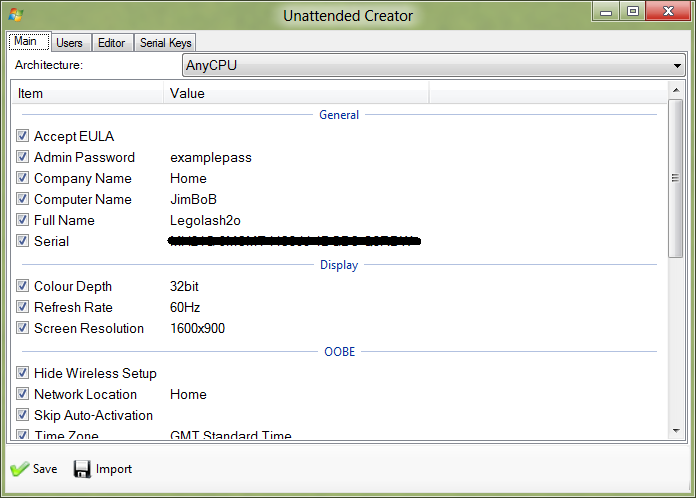
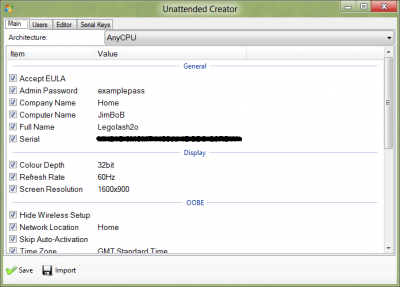
This will let you have you Windows installed unattended. It's not the most complete unattended out there but it's better than nothing. Luckily most of this is self-explanatory, note it is recommended to leave 'Architecture' set to 'AnyCPU' which means it should work for both x64 and x86 installs. Main This is where you select the most important parts of the unattended file, like your name, serial key, time zone, screen resolution, updates, Auto-Logon, etc... Users The 'Users' tab lets your add pre-installed usernames on the computer, with passwords, user group, description, again self-explanatory. Editor (Advanced) It is recommended to leave this alone unless you know what you're doing, since W7T does not have full unattended features it allows users to add their own entries and save them to a file, it also allows the user to see what will be saved. Serial Keys These serial keys are known as 'Default Keys', they are basically just used to make the install unattended by leave Windows de-activated and keeps the 30 day trial. WARNING: If you use a Ultimate serial key then you must install Ultimate otherwise it will error. Integration You can use the 'WIM Manager' to integrate a unattended file.
-
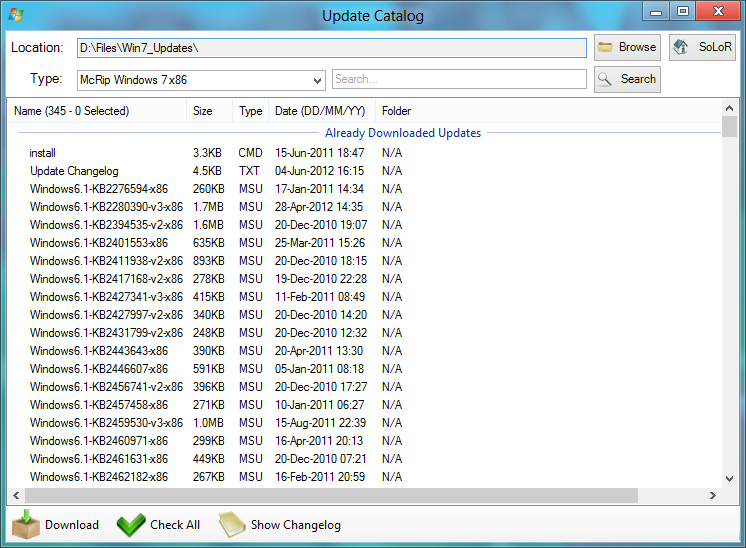
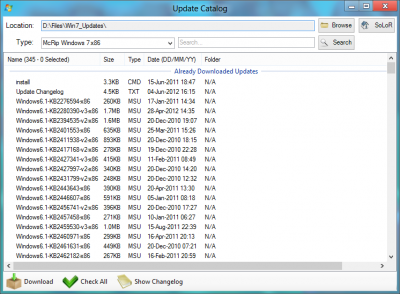
This tool lets you download the latest updates which are not available via Windows Updates. This updates are know as QFE updates and are made available to those who have specific issues but everyone just integrates them anyway. Note: Previous use If you have used this tool before then use the top browse button and select the folder you downloaded to them previously. Step 1: Select from list Select which updates you want in the list, i.e. Windows 7 x64. If you selected a previous folder then W7T will scan and tell you which updates are new and move the old ones to a folder called 'Old' Step 2: Select Updates Once selected W7T will show you a list of updates and all of the ones you don't have should be clicked. Step 3: Start Press 'Download' and watch your updates download. INFO: Some updates go into sub-folders because they only need installing if you have that specific feature installed and they're not always needed.
-
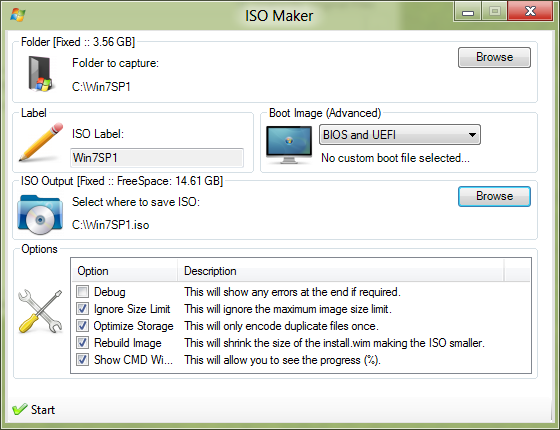
This tools turns your folder with the Windows image in it, into a fully bootable ISO. As of v1.4.0.1 ISO Maker now supports UEFI as default. Step 1: Select the folder you wish you wish to make into an ISO. Press the first 'Browse' button. Step 2: Type in an ISO label. Step 3: Select where you want to save the new ISO. Press the second 'Browse' button. Option: Boot Image You can choose to add a custom boot image if required, i recommend you leave this at the default setting unless you are having issues. Option: Rebuild Image It is best to rebuild the image before it makes an ISO, this will decrease the size of your WIM image especially if you have made lots of changes and removed file. Step 4: Press 'Start' Once pressing start a black command prompt screen should appear with a progress indicator.

-
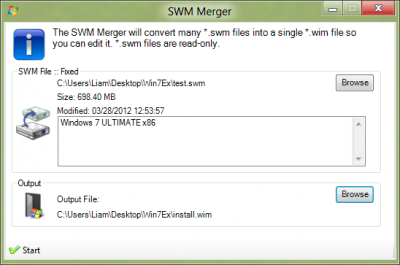
SWM Merger is the tool where you can merge smaller *.swm files into a larger editable install.wim. Step 1: Select the main SWM Click the first browse button and select the *.swm file you wish to merge Step 2: Select your 'Output' file Select the location where you want your new install.wim to go. Step 3: Press start Press start and wait for it to finish
-
What i can do is, if W7TRunOnce detects a "Drivers" folder on any partition/dvd/usb root it will use pnputil to install all the inf files?
-
It's a big task so it will definitely have to wait. P.S. I aint mad
-
Again, Online Drivers does not work with wim images, it works on the currently installed OS, there isn't a second phase if Windows is already installed. It will probably not benefit the installation at all apart from slow it down. Online Driver Installer does not even use dism, it uses pnptuil
-
I've sent you a personal message with a link to the latest alpha, the RunOnce file in this version writes logs, hopefully this will see what it happening
-
I've reached test 20, v1.4.0.0_T21 will be released publicly for everyone to test. It won't be official, but i'm sure people would want to test it and hopefully give some feedback. NOTE: When i say it wont be official i mean it wont tell users there is a new version when they open W7T and v1.3.0.102 will still be the official latest version.
-
The only thing i can think of that can affect it is the attribute settings (system + hidden). EDIT: I'll do some testing and get back to you.
-
Hmm, that's the latest version for the v102 build. It's a bit strange why it would work in VMWare but not a live PC :/
-
Preferably the laptop
-
Go to C:\Windows\System32\W7TRunOnce.exe, right-click Properties > Details. What version is it?
-
There is but it's more complicated It would require mounting the image using WIM Registry Editor, exporting HKLM\\W7T, editing it and then import it on your current OS and then reboot.
-
You should be able to see the message in the top right hand corner. Some more fixes: *1.4.0.1^FIX: Could not mount image if it had no <NAME> variable i.e. "N/A" *1.4.0.1^FIX: WIM Manager could not rename all images *1.4.0.1^FIX: MSU could not convert if you selected output path as drive root *1.4.0.1^FIX: Some tools did not report which image was being mounted/unmounted properly *1.4.0.1^FIX: Could not extract file is 'SevenZipSharp.dll' was missing. *1.4.0.1^FIX: Could not extract file is 'Interop.IWshRuntimeLibrary.dll' was missing. *1.4.0.1^FIX: Unattended Creator no longer lets you use invalid characters for 'Computer Name' *1.4.0.1^FIX: Fixed a potential language pack integration bug. *1.4.0.1^FIX: Fix a language pack integration bug where a 'license' folder could not be copied *1.4.0.1^FIX: Fixed an issue where adding updates did not cancel on request using Update Integrated *1.4.0.1^FIX: Fixed 'Read Task.txt' in AIO Integrator *1.4.0.1^FIX: Removed hand cursor from Welcome Tab (Tools Manager) *1.4.0.1^FIX: Current OS option in AIO did not uncheck if user selected no *1.4.0.1^FIX: Better detection of architecture for drivers *1.4.0.1^FIX: Some files did not extract properly if 'ExtractTo' folder was not created first *1.4.0.1^FIX: CAB Retriever did not copy files. *1.4.0.1^FIX: Fixed issue when adding unattended tried to replace itself. *1.4.0.1^FIX: Fixed error which sometimes occured if WIM Registry Editor did not mount properly *1.4.0.1^FIX: Progress bar now works correctly when integrating drivers into boot.wim *1.4.0.1^TWEAK: Change DPI Setting *1.4.0.1^Tidied up Addon Maker, centered things, etc.. *1.4.0.1^In Addon Maker, variables will show tooltip showing where files will go *1.4.0.1^Addon Maker lets you edit addons *1.4.0.1^Added antivirus detection *1.4.0.1^UEFI support added for ISO Maker *1.4.0.1^W7T now shows which Windows drivers are for. *1.4.0.1^You can double click a driver to show its .inf file in notepad *1.4.0.1^Lots of GUI changes *1.4.0.1^Driver Installer lets you install/remove drivers on the live system. *1.4.0.1^Update Installer now lets you uninstall updates *1.4.0.1^You can now save or load AIO lists individually without affecting the other lists
-
Ricktendo was correct, the Online Driver installer is for the currently installed Windows and doesn't work with images at all.
-
Is the apps folder still in the root of the USB, have you tried without doing the +S +H command?
-
It should still copy if set as a system or hidden, but he specifically said he turned the folder into a system file which won't work.