Leaderboard
Popular Content
Showing content with the highest reputation since 04/30/2023 in Posts
-

Microsoft .NET Framework 4.8 for Windows 7
Dimanya and 3 others reacted to abbodi1406 for a topic
Updated KB5034615 (4.8.4700.4)4 points -
Visual C++ Redistributable Runtimes
najimhmd776 and 2 others reacted to abbodi1406 for a topic
Description: The Visual C++ Redistributable Packages install runtime components that are required to run applications that are developed by using Visual Studio. These packages install run-time components of these libraries: C Runtime (CRT), Standard C++, ATL, MFC, C++ AMP, OpenMP and MSDIA. read more. OS: Windows All Versions: VC++ 2022: 14.40.33807.0 VC++ 2013: 12.0.40664.0 VC++ 2012: 11.0.61135.400 VC++ 2010: 10.0.40219.473 VC++ 2008: 9.0.30729.7523 VC++ 2005: 8.0.61187 VC++ 2003: 7.10.6119.0 Vc++ 2002: 7.0.9975.0 + Legacy Visual Basic Runtimes Files Contents: vcredist_x64_Win7 / vcredist_x86_Win7: All runtimes for Windows 7 SP1 vcredist_x64_2022_WinAll / vcredist_x86_2022_WinAll: Visual C++ 2022 vcredist_x64_2013d_WinAll / vcredist_x86_2013d_WinAll: Visual C++ 2013, 2012, 2010, 2003, 2002 Visual Basic 6.0 Runtimes vcredist_x64_SxS_Win7 / vcredist_x86_SxS_Win7: Visual C++ 2008, 2005 for Windows 7 SP1 vcredist_x64_SxS_Win810 / vcredist_x86_SxS_Win810: Visual C++ 2008, 2005 for Windows 8.1/10 Important Notes: # Integrating SxS 2008/2005 addons require launching Wintoolkit with TrustedInstaller privileges, to gain write access to WinSxS directory for that, you need to use NSudo (or other similar tools): - download and extract latest release Binary.zip - launch Win32\NSudo.exe or x64\NSudo.exe, or run NSudo.bat as administrator - make sure User is set to TrustedInstaller - check "Enable All Privileges" - paste Wintoolkit.exe path in the lower box (or Browse to the file) - click run if you are using Windows 7 Simplix Update Pack, you don't need that, it already handle the required privileges # vcredist_x64_Win7 / vcredist_x86_Win7 is AIO addon, mainly to be used with Simplix Update Pack, or else you need Wintoolkit with NSudo # VC++ 2022 runtimes are binary compatible and upgrade to VC++ 2015-2017-2019 and cover all VS 2015-2017-2019-2022 programs # To complete VC++ 2022 functions for Windows 7/8.1, you need to integrate Universal CRT components, which is available with latest Monthly Rollup, or updates KB3118401/KB2999226 Download: vcredist_x64_Win7_20240411.WA vcredist_x86_Win7_20240411.WA vcredist_x64_2022_WinAll_14.40.33807.WA vcredist_x86_2022_WinAll_14.40.33807.WA vcredist_x64_2013d_WinAll.WA vcredist_x86_2013d_WinAll.WA vcredist_x64_SxS_Win7.WA vcredist_x86_SxS_Win7.WA vcredist_x64_SxS_Win810.WA vcredist_x86_SxS_Win810.WA you can find latest releases -> here SHA1 checksums: 05e938f354c059d89d846d2e9a7591d05154aa70 *vcredist_x64_2013d_WinAll.WA 534f1e53080819aeb58e3b060d7c6a0a76b4d4d4 *vcredist_x86_2013d_WinAll.WA 8cc9f65fc444a878d8cabd0ad317597edb552f07 *vcredist_x64_SxS_Win7.WA 886faa949e7d51a40dc8d467f65c373f887c2ec3 *vcredist_x86_SxS_Win7.WA 94e267e5e6ff89854bd64b6260333664a266c754 *vcredist_x64_SxS_Win810.WA 206fda69fa2d3fd838dd9e3ee33f35c4cd7a2cae *vcredist_x86_SxS_Win810.WA Credits to ricktendo for original repack AIO3 points -
Microsoft .NET Framework 4.8 for Windows 7
Lions and 2 others reacted to abbodi1406 for a topic
Description: The .NET Framework is a popular development platform for building apps for Windows, Windows Store, Windows Phone, Windows Server, and Windows Azure. The .NET Framework platform includes the C# and Visual Basic programming languages, the common language runtime, and an extensive class library. read more. Info: The .NET package will be slipstreamed as pre-installed OS: Windows 7 SP1 Notes: - The addon will conflict with some Windows Updates (.NET 3.5 Family), so leave the addon's integration to the last. - Add main addon first before LangPack addon, to get ASP.NET service localization properly. - To function properly, .NET 4.7.x require D3DCompiler_47.dll component, which is found in either the current "Monthly Quality Rollup" or "update KB4019990". It is recommended to integrate it first, or you can install it later. Windows6.1-KB4019990-x64.msu Windows6.1-KB4019990-x86.msu .NET 4.8: .NET 4.7.2: Languages Codes Reference:3 points -
Visual C++ Redistributable Runtimes
geodasoft and 2 others reacted to abbodi1406 for a topic
Updated VC++ 2022: 14.40.336173 points -
Visual C++ Redistributable Runtimes
GlacialMan and 2 others reacted to abbodi1406 for a topic
Updated VC++ 2022: 14.38.331353 points -
Visual C++ Redistributable Runtimes
GlacialMan and 2 others reacted to abbodi1406 for a topic
Updated VC++ 2022: 14.38.331303 points -
Microsoft .NET Framework 4.8 for Windows 7
GlacialMan and 2 others reacted to abbodi1406 for a topic
Updated KB5027129 + KB5028586 (4.8.4645.1)3 points -
Hi mooms, hi Liam, nice to see you again, I hope you are well! I'm still using WinToolkit for Win 10 & Win 11.3 points
-
.thumb.jpg.7d51cc81264da0c3589cc92d7d3aed7b.jpg)
Google Chrome 124.0.6367.92 Dual x86x64 Silent
zuardin and one other reacted to 大†Shinegumi†大 for a topic
Chrome 124 makes it easier to install any website on desktop You could install any website as a web app-style window for a long time on Chrome for desktop now, but the process wasn’t very intuitive. Rather than using a dedicated installation option, you had to use the Create Shortcut option in Save and Share in the overflow menu, and then tick the Open as window. You may not have to remember to tick the checkbox in future Chrome versions With Chrome 124, you can make the decision to turn a website into a windowed app right inside the Save and Share menu, saving you from the rather complicated route with the checkbox. To enable this, you currently need to turn on the chrome://flags/#web-app-universal-install and chrome://flags/#shortcuts-not-apps flags. Chrome 124 works on a bottom bar for the Google app Chrome experimented with a bottom bar interface a long time ago on Android, and its iOS version recently received an optional fully bottom-based interface. While there isn’t any evidence that Google is working on something like that for Chrome for Android, the company might do the second best thing and add a bottom bar to Chrome custom tabs opened via the Google app. That’s basically all we know about it at this point, with Chrome 124 only showing early evidence that this is coming. The bottom bar might house Google-specific options or ways to dive deeper into search, but that’s just speculation. Chrome 124 preps a Circle-to-Search-style feature for desktops Google is working on a serious Lens upgrade for Chrome on desktop, and we might just see a new Android feature make its way to the browser. It basically works by turning your current tab into a screenshot that you can use Lens on. Right now, that’s about everything we can glean so far, but given that Google recently introduced Circle to Search on select Samsung and Google phones, we can imagine that you’ll be able to select different portions of the visible website and use it to dive into a search session. Chrome 124 lays groundwork for a new keyboard shortcut Chrome 124 is adding preliminary work for a new keyboard shortcut. Rather than remembering your operating system’s sometimes convoluted way to exit a fullscreen window, you’ll simply be able to press and hold Esc to achieve the same. This isn’t currently live, though. Chrome 124 stores local passwords in Play services on Android You can use Chrome as your local password manager on Android when you don’t sync your passwords with your Google account. Thanks to the most recent changes to the way Google works with passwords, it will change where your credentials are stored on Android, though. With Chrome 124, local passwords are now stored in the Google Play Services, much like they already were with the cloud-based version of the password manager. This means that the interface looks slightly different, but the new version should be more reliable for autofilling in other apps. This policy was already in place with Chrome 123 for new users, but the migration is now happening for everyone with Chrome 124. Silent installation Windows 7/8 تثبيت صامت Silent installation Google Chrome 109.0.5414.120 AIO windows 7 last version Install Silent2 points -
Visual C++ Redistributable Runtimes
raddy and one other reacted to abbodi1406 for a topic
Updated VC ++ 2022: 14.40.338072 points -
Microsoft .NET Framework 4.8 for Windows 7
Dimanya and one other reacted to abbodi1406 for a topic
Updated KB5036615 (4.8.4718.4)2 points -
Microsoft .NET Framework 4.8 for Windows 7
GlacialMan and one other reacted to abbodi1406 for a topic
Updated KB5031995 (4.8.4682.1)2 points -
Microsoft .NET Framework 4.8 for Windows 7
GlacialMan and one other reacted to abbodi1406 for a topic
Updated KB5031001 (4.8.4676.1)2 points -
Microsoft .NET Framework 4.8 for Windows 7
GlacialMan and one other reacted to abbodi1406 for a topic
Updated KB5029929 (4.8.4667.2)2 points -
Microsoft .NET Framework 4.8 for Windows 7
GlacialMan and one other reacted to abbodi1406 for a topic
Updated KB5028958 (4.8.4654.6)2 points -
Microsoft .NET Framework 4.8 for Windows 7
GlacialMan and one other reacted to abbodi1406 for a topic
Updated KB5028860 (4.8.4645.5)2 points -
Microsoft .NET Framework 4.8 for Windows 7
GlacialMan and one other reacted to abbodi1406 for a topic
Updated KB5027129 (4.8.4644.2)2 points -
Visual C++ Redistributable Runtimes
zuardin and one other reacted to abbodi1406 for a topic
Updated VC++ 2022: 14.36.325322 points -
Hi Lego, glad to see you're still around. I don't use WTK anymore but it was useful in the Win7 days. Thanks.2 points
-
Visual C++ Redistributable Runtimes
raddy and one other reacted to abbodi1406 for a topic
Updated VC++ 2022: 14.36.325022 points -

SumatraPDF 3.1.2 & 3.5.2
大†Shinegumi†大 reacted to mooms for a topic
1 point -
Visual C++ Redistributable Runtimes
raddy reacted to abbodi1406 for a topic
Updated VC++ 2022: 14.38.329191 point -
Java Runtime Environment 8 Update 381 Dual x86x64 New1 point
-
I Agree with NIM. Using Windows 10 LTSC would also help, because it is much less bloated. You could probably achieve something similar with some debloating scripts/applications in Windows 10 consumer edition; I've stumbled upon this yesterday: https://forums.mydigitallife.net/threads/slimdown10-–-turn-windows-10-22h2-into-classic-legacy-windows.86552/1 point
-
It kinda just worked for me, I didn't need to inf mod or anything. I'll do more proper testing soon. I did notice a weird issue running Java, but I'm not sure if that was from transferring the SSD with XP between like 4 different machines before ending up in the laptop.1 point
-
Depends on your laptop, if you have the option, go for it. But if it's a Dell it should've automatically disabled it when in XP, because that's what my M4800 did.1 point
-
Well, if the other ACPIs you used worked, that means your GPU uses Optimus, which Vista and earlier can't use. Causes the code 10.1 point
-

Adobe Reader X - v10.1.4
najimhmd776 reacted to Simpuhl for a topic
Description Easily view, print, and collaborate on PDF files with free Adobe Reader X software Adobe Reader software is the global standard for electronic document sharing. It is the only PDF file viewer that can open and interact with all PDF documents. Use Adobe Reader to view, search, digitally sign, verify, print, and collaborate on Adobe PDF files. Version: 10.1.4 Platform: x86 & x64 Uninstallable: Yes Credit: *Simpuhl* Download! - MD5 - A30A01AD7CD08C00EDD1CCBBB8EFE74B Note: Add this as a silent installer... No Switches needed! Details: I took the offline installer, extracted it... edited it with Adobe Customization Wizard X, made it silent, supressed restart, eula, and made it default pdf viewer. It will make default desktop and startmenu icons and saved it. Then I used iexpress to make it a single .exe and then silent extract and run the setup.exe.1 point -

All-In-One Integrator
vaveasna reacted to Legolash2o for a topic
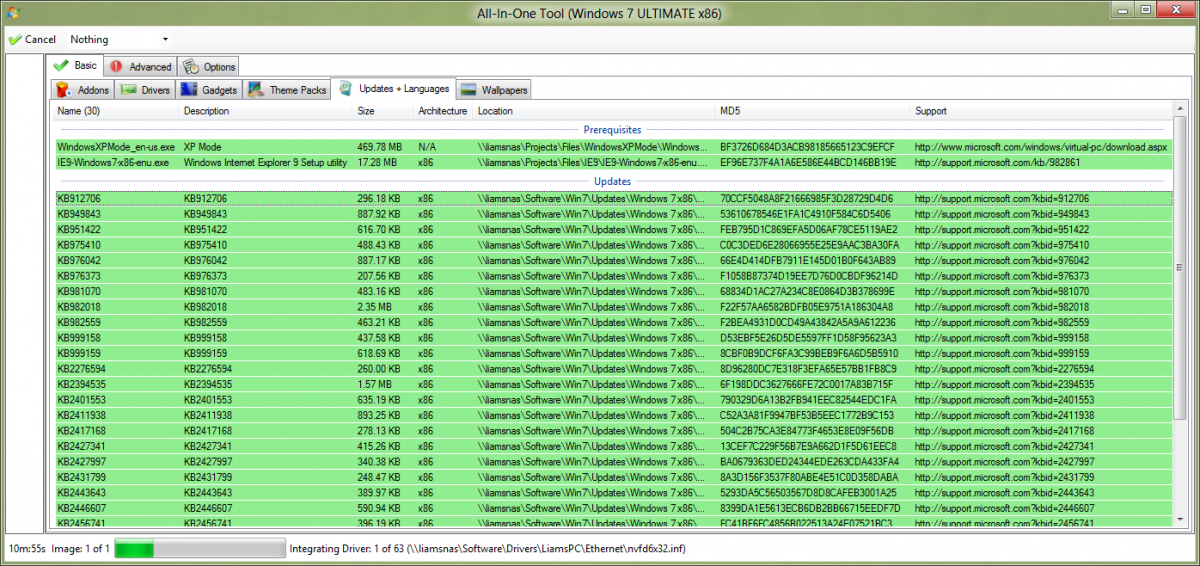
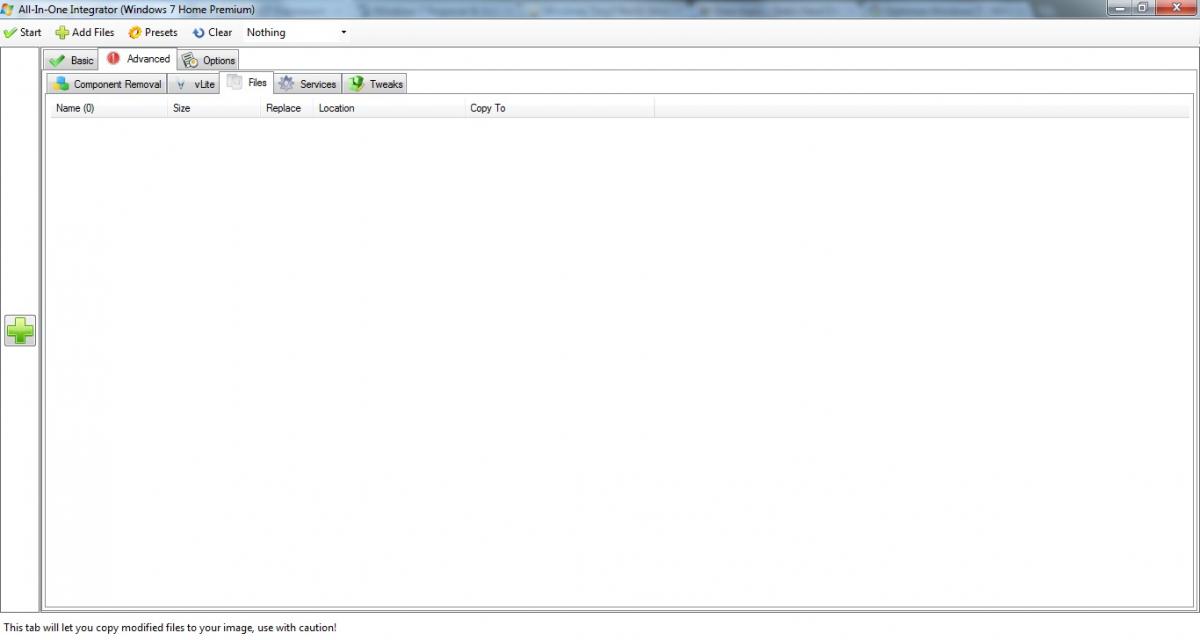
Introduction The 'All-In-One Integrator' is one of the most important tools available in Windows 7 Toolkit, this is the tool which lets you integrate everything into your image such as Updates, Drivers, Wallpapers, Tweaks, Gadgets, etc... but it also lets your remove things too, so lets get started... Selecting your image When you first load the 'AIO Integrator' you will be asked which image you wish you use, if the list it empty, click 'Browse' and select your extract ISO or select the install.wim directly. Once done you should see a list of images, you can either double click an item or press select. TIP: You can hold ctrl or shift to select more than one image, once done press 'Select'. Select your preset If you have used this tool before then you will be greeted by a list of things you have previously done, you can simply select a previous tasks and click 'Load Preset' or if you want to start fresh and do something different then press 'Skip (No Preset)'. ---Basic--- This tab has all the most important tools, to get the most basic jobs done such as integrate updates and drivers. I recommend beginners or new users to stick to this tab. Basic: Addons Addons are pre-installed programs which have been created by other users (usually *reaper*), they have the file extension *.WA, I would probably say programs such as crap cleaner and flash are the most common. If you have any addons then press 'Add Addons' at the top or the green '+' button on the left to add them to this list. Basic: Drivers Drivers are what make your devices and hardware work, sometimes its easy just to them them already installed after you have installed Windows. If you want to add some you just have to press 'Add Drivers' and browse to the folder which contains your drivers (*.inf files). You may notice that not all of them get added, this is because W7T does not include duplicate drivers with the same MD5 files and not all *.inf files are actually drivers and just normal inf files. Colours Red: If the user has selected an x86 image and then adds an x64 driver to the integration list then that driver will display red. Blue: When adding drivers to the list Win Toolkit also makes note of the *.inf MD5 hash, if there's another driver with the same MD5 hash then the items will change to a blue. Basic: Gadgets Gadgets are those little widgets things on your desktop, for example 'CPU Meter'. On Vista they had the gadget bar but on Windows 7 you can place them anywhere. If you want to have addons pre-installed then click 'Add Gadgets' and select all of your *.gadget files. Basic: Theme Packs These area of the tool lets you add your Windows themes, so when you have installed Windows you can select from your favourite theme packs. Just click 'Add Themes' and select your *.themepack files. Basic: Updates + Languages Its very handy to have all of the Windows updates installed. This makes sure your computer is up-to-date, bug free and more secure. Click 'Add Updates' and simply selected your *.MSU or *.CAB files and they will be added to the list, alternatively you can change the drop down box from MSU/CAB to EXE which will allow you to install Internet Explorer 9 and Windows XP Mode. NOTE: If you wish to install updates in LDR/QFE Mode then the option to do that is on the 'Options' tab at the top. Basic: Wallpapers As usual, this one is pretty self-explanatory, here you can add your favourite desktop wallpapers so that they are ready to be selected after Windows installation. ---Advanced--- Users who have more experience with Windows 7 Toolkit or experience with modifying images can use this tab, i wouldn't recommend new users to start using this until they gain a bit of confidence. Advaned: Component Removal Windows comes with features already installed, this features can be anything from Windows Media Player, Internet Explorer, Windows Media Center to more important features. The list you see here is not a full as the list from 'Component Remover' because the AIO contains a pre-defined set of features which i've manually added whilst 'Component remover' actively scans your image and lists everything including updates. I wouldn't recommend this to new users at all, and just to note that once something has been removed it can't be returned without using a fresh ISO. This tab doesn't do a full removal like vLite and uninstalls the features using DISM. Advanced: vLite Some users may instantly know what this does, this is similar to Component Removal but actually deletes files and therefore reduces the image size more significantly. It quite a new tool so there's not many items yet but i will hopefully add more as time progresses. Advanced: Files This replaces files within your image, so if for example you modify system32 files, you can import them into your image using this tool. This will most probably be used by users who have custom 3rd party theme files. Caution though as replacing an important file with a bad one can and most probably will make your ISO unbootable, so be very careful! Advanced: Services As you know Windows has many services running in the background. This part of the tool lets you reduce that and get the best performance from your computer. As you can see on the picture (below) you have to click the item in the column to change its value. You can also choose from 'BlackVipers' presets depending on what you use your computer for, you can also use the shortcut buttons on the left to do the same thing. NOTE: Services which are important are not available in the list, if you don't know anything about a service you can press the purple 'i' button on the left sidebar. Advanced: Silent Installs + SFX A lot of users like to have programs installed silently after Windows has completely installed, simply click 'Add Silent Installer' and select your EXE, you may have to go on google to find it's silent switch which is usually something like '/s /q /qn /quiet /silent' and so on. TIP: Some developers have already created silent installers so you can leave that box blank. If you have a folder full of silent installers then you can select them all and they will be added in bulk. Option: Always Install If you tick this option the the program(s) you add will be installed automatically, if it's unticked then it will ask the user what program(s) they wish to install straight after Windows installation. Option: Copy Folder Some programs such as Office have a setup.exe and then a bunch of other needed files in the same/sub-folder as the installer. Tick this option to include those files. This option is not usually needed. Advanced: Tweaks Most users will add tweaks to their install, there are literally hundreds to describe them all here but hopefully the descriptions are detailed enough for you. Just simply tick the ones you want. ---Options--- You don't really have to change these, most of them are used by me (Legolash2o) to debug issues. If you need to know what something is then just put your mouse over its name and a tooltip will appear. I will mention that the 'Prompts' items are they ones which tell you after AIO has finished what has been integrated successfully. Start OK now your ready, click start and you will be asked to enter a name, this is so you can use the same session next time you use AIO Integrator, similar to vLite/nLite last session presets. The image will automatically mount if not mounted: It will then integrate everything, green means the update has been integrated sucessfully, whilst yellow is the current item it's working on: Once done the image will save all the changes: Some drivers or language packs need to mount the boot.wim if, if it does then it will mount it now. Drivers are ususally ones for SCSI, HDD and SATA devices: Once everything has been completed it willre build the image to decrease it size so your ISO will be much smaller (hopefully). Now that everything is done, you can review what got integrated, now you can use the ISO Maker to create an ISO or just copy it to your USB device (assuming it's bootable). 1 point
 -
Win Toolkit - Current Version (1.7.0.16)
mooms reacted to Legolash2o for a topic
Hello! I hope everyone is doing well and finding Win Toolkit still useful. Time unfortunately.1 point -
I've just learned from abbodi that MS has recently removed the August 2018 Windows 7 ISO downloads. so the links to them are now broken and produce 404 file not found errors in late March 2023 (yup, Windows ISO Downloader can't download them anymore) another "stake knife" driven onto the heart of Win71 point
-
Microsoft .NET Framework 4.8 for Windows 7
raddy reacted to abbodi1406 for a topic
Updated KB5022509 (4.8.4614.10)1 point -
Microsoft .NET Framework 4.8 for Windows 7
raddy reacted to abbodi1406 for a topic
Updated KB5020879 (4.8.4590.2)1 point -
Microsoft .NET Framework 4.8 for Windows 7
raddy reacted to abbodi1406 for a topic
Updated KB5020621 (4.8.4585.2)1 point -
What are you trying to tell ? You are posting installer repacks yourself, so go make one yourself.1 point
-

XPTSP Download?
rasoanirina reacted to George King for a topic
Anybody have archived these projects?1 point -
Use COM methods and properties via the COM Automation objects support. So I translate a Delphi script to Inno Setup section.And it work! Here is a part of script in [code] section: [code] http://www.jrsoftware.org) There are someway to pin taskbar depend on one's choice. We can add a [task] section in InnoSetup. if one do not want to see the "task selected page"(like me ), the second way is to create a new CheckBox in Inno [code] section. And in the second way one need to control the CheckBox show or hide inprocedure CurPageChanged(). then call the function like: zylPinAppToTaskbar('c:\window', 'notepad.exe'); An example project for Unicode Inno Setup is provided as download. The attachment "pintaskbar.zip" is the script. Unzip the file pintaskbar.zip,you can get two files named "PinShortcutOntoTaskbar-task.iss" and "PinShortcutOntoTaskbar-checkbox.iss". Please copy the *.iss files to the directory: ./Inno Setup 5/Examples Then build the program and run PinTaskbar.exe. References http://blog.csdn.net/ccrun/article/details/6906471 http://gallery.technet.microsoft.com/ScriptCenter/b66434f1-4b3f-4a94-8dc3-e406eb30b750/ http://www.codeproject.com/Tips/713824/Pin-a-shortcut-onto-the-Taskbar-or-Start-Menu The following is the script of the second way, I think you can modify it to the first way. If the attachment was broken, copy the following script to a *.iss file. ; -- PinShortcutOntoTaskbar.iss -- ; Pin a shortcut onto taskbar on Win7 & Win8. ; @author: Yaliang.Zhao <shuangxiang2008@google.com> ; @brief: I test is on 32-bit Win7 & Win8, but ; I thins it will work on X64 version. [setup] AppName=PinTaskbar AppVersion=1.0 OutputBaseFilename=PinTaskbar DefaultDirName={pf}\PinTaskbar OutputDir=./ DisableStartupPrompt=yes DisableReadyPage=yes [Files] Source: "MyProg.exe"; DestDir: "{app}" ;[Tasks] ;Name: pintaskbar; Description: "Pin shortcut onto taskbar" ;Following is how to use [Code] var PinTaskBarCheck : TNewCheckBox; //the function is work well on Unicode Inno Setup, //if Non Unicode Inno Setup, one need to modify, //and I think you can do it! //Inno use Win32 API function LoadLibrary(lpFilename : String) : LongInt; external 'LoadLibraryW@kernel32.dll stdcall delayload'; //if Non Unicode Inno Setup, use LoadLibraryA function FreeLibrary(hModule : LongInt) : BOOL; external 'FreeLibrary@kernel32.dll stdcall delayload'; function LoadString(hInstance:LongInt; uId:UINT; lpBuffer:String; nBufferMax:Integer) : Integer; external 'LoadStringW@user32.dll stdcall delayload'; //if Non Unicode Inno Setup, use LoadStringA //here is the function //@param strPath The App's directory, //@param strApp The App's name //@example zylPinAppToTaskbar('c:\window', 'notepad.exe'); procedure zylPinAppToTaskbar(strPath, strApp: string); var vShell, vFolder, vFolderItem, vItemVerbs: Variant; vPath, vApp: Variant; i: Integer; sItem: String; h: LongInt; szPinName: String; filenameEnd : Integer; filename : String; strEnd : String; begin SetLength(szPinName, 255); h := LoadLibrary(ExpandConstant('{sys}\Shell32.dll')); LoadString(h, 5386, szPinName, 255); FreeLibrary(h); strEnd := #0; filenameEnd := Pos(strEnd, szPinName); filename := Copy(szPinName, 1, filenameEnd - 1); if (Length(filename) > 0) then //WinXp or lower, no pin taskbar function begin vShell := CreateOleObject('Shell.Application'); vPath := strPath; vFolder := vShell.NameSpace(vPath); vApp := strApp; vFolderItem := vFolder.ParseName(vApp); vItemVerbs := vFolderItem.Verbs; for i := 1 to vItemVerbs.Count do begin sItem := vItemVerbs.Item(i).Name; if (sItem = filename) then begin // 63 63 72 75 6E 2E 63 6F 6D vItemVerbs.Item(i).DoIt; break; end; end; end; end; //You can use zylPinAppToTaskbar like this procedure CurPageChanged(CurPageID: Integer); begin //When Finished page is shown, call the function //You can also call is when the "Finish" button clicked. if CurPageID <> wpWelcome then PinTaskBarCheck.hide else begin PinTaskBarCheck.show; end; if CurPageID = wpFinished then begin //if IsTaskSelected('pintaskbar') then //if Selected the [task] // zylPinAppToTaskbar(ExpandConstant('{app}'), 'MyProg.exe'); if PinTaskBarCheck.Checked then zylPinAppToTaskbar(ExpandConstant('{app}'), 'MyProg.exe'); end; end; procedure InitializeWizard; begin PinTaskBarCheck := TNewCheckBox.Create(WizardForm); with PinTaskBarCheck do begin Parent := WizardForm; Caption := 'Pin it onto taskbar'; Top := 200; Left := 200; Width := ScaleY(200); Height := ScaleY(15); State := cbChecked; //Hide; end; end; pintaskbar.zip1 point
-
XP64 SP2 + post SP2 update pack Gigabyte B450 Aorus M F52 BIOS AGESA 1.0.0.6 (original F41 AGESA 1.0.0.3 also worked), (booted to XP64 on a different PC with F62d, so maybe Zen3 as well?) Ryzen Zen2 Matisse CPU Issues Restart does not work with XP/XP64 with any of the acpis when using a PS2 keyboard. Have to manually push the restart button. Shutdown works fine. Workaround, use USB keyboard after it is installed (or integrate backported USB3 driver) BIOS Gigabyte B450 Aorus M BIOS settings So I noticed that by default virtualization (AMD-V) aka "SVM" was disabled by default. BIOS > MIT > Advanced Freq Settings > Advanced CPU Settings > SVM Mode Enabled & CoolNQuiet Enabled BIOS > MIT > XMP Profile 1 BIOS > BIOS > CSM Support Enabled & Fastboot Disabled & Full Logo Disabled You can also enable a PPT limit on the CPU lower than default. Lose a little bit of performance for a nice drop in heat. BIOS > Peripherals > AMD Overclocking > PBO to Enabled BIOS > Peripherals > AMD CBS > Package Power Limit > Manual & ## Picture shows a nice spot for power/performace around 50W ACPI ACPI needed for new motherboards. First versions were based on longhorn 5048 with some BSODs patched. There was a x86 version based on the original XP acpi with new instructions patched in assembly as well (6666). Latest version for XP/XP64 (7777) is here, https://www.mediafire.com/file/wsqgptapdrxhidf/ACPI2.0_v4_x86+x64_5.1+5.2.7z/file Drivers GPU Drivers (Tested nvidia GT710, GTX750Ti, and amd HD5450 video cards) NVIDIA 368.81 7/10/2016 AMD 14.4 09/05/2014 Onboard LAN/Audio drivers Realtek Audio 5.10.0.7514 8/23/2016 Realtek LAN 5.836.125.2018 1/25/2018 AMD CPU CoolNQuiet Driver 1.3.2.53 8/22/2007 Download AMD Processor Driver 1.3.2.53 and turn on power management if you want CPU to clock down during idle. Chipset Drivers (works with native storport on XP64, for XP you will need to integrate backported storport from Advanced) DEV7901/43C8 FCH/400 Series SATA Controller Option1: AMD 1.2.1.321 Download an old 13.4 XP/XP64 chipset pack from AMD. Open up amd_sata.inf and add in these lines underneath existing DEVs (a non B450 may have different DEV_): %AMDSATA.DeviceDesc% = amd_sata_inst, PCI\VEN_1022&DEV_7901&CC_0106 %AMDSATA.DeviceDesc% = amd_sata_inst, PCI\VEN_1022&DEV_7904&CC_0106 %AMDSATA.DeviceDesc% = amd_sata_inst, PCI\VEN_1022&DEV_43C8&CC_0106[/spoiler][spoiler=DEV7901/43C8 FCH/400 Series SATA Controller Option2: StorAhci_V1.0_20200928]Download Schtrom's StorAhci SATA AHCI Driver from sourceforge. Pros: Universal driver. Not limited to just AMD controllers. Cons: Sequential speed is slower compared to AMD 1.2.1.321 Needs SMART patch on backported win7 storport to enable SMART. DEV7901/43C8 FCH/400 Series SATA Controller Option2: StorAhci_V1.0_20200928 Download Schtrom's StorAhci SATA AHCI Driver from sourceforge. Pros: Universal driver. Not limited to just AMD controllers. Cons: Sequential speed is slower compared to AMD 1.2.1.321 Needs SMART patch on backported win7 storport to enable SMART. NVMe OFA NVMe 1.3 Storport Miniport Option1: 20180719 Download Schtrom's OFA NVMe 1.3 Storport Miniport from sourceforge. You will need to integrate a new version of storport.sys for it to work. Version 4173 (KB943545) or newer. You can also use the postSP2 update pack. Tested with a Samsung PM981 and storport 5.2.3790.4485. -Version 1.3 works. Version 1.5 stalled in the TXT setup just before format partition page. -Use MBR for boot drive. Native XP/XP64 does not boot from GPT. -Use NTFS. FAT32 starts install but hangs in the GUI setup halfway through Installing Devices. -No SMART data from CrystalDiskInfo, SMART with HWiNFO. DEV43D5 400 Series USB 3.1 XHCI Controller 1.0.5.3 Download the Windows 7 chipset pack for the B450 from AMD. 1.0.5.3 USB driver from USB31_PT for the controller and the hub works with the motherboard USB ports. But you get a Code 39 error. To fix, you will have to copy usbd.sys to your \system32\drivers folder for a live system. You can also modify the inf file in two spots to also copy over the usbd.sys file when it copies over the driver sys file like the amdxhc31.sys or amdhub31.sys. Use can decompress the usbd.sy_ file from your ISO or extract latest version from an unofficial service pack. In CMD, "expand usbd.sy_" Chipset Drivers (advanced) NTOSKRNL Emu_Extender required -Download NTOSKRNL Emu_Extender from sourceforge. https://github.com/MovAX0xDEAD/NTOSKRNL_Emu -Follow the instructions and compile backported drivers. THe USB driver needs Kernel Mode Driver Framework 1.11 (WDF 1.11). -Follow the instructions from above and create updated wdf files. Useful Tools: -Hexplorer or equivalent hex editor -Dependency Walker -PEChecksum.exe DEV7901/43C8 FCH/400 Series SATA Controller Option3: AMD 1.2.1.402 -Download the Windows 7 chipset pack for the B450 from AMD. -Open up amd_sata.inf and change the two lines that have NTAMD64.6.1 -> NTAMD64 (NTx86 if doing the 32bit version) -Add in these lines underneath existing DEVs if not already there (non B450 board may have different DEV_): %AMDSATA.DeviceDesc% = amd_sata_inst, PCI\VEN_1022&DEV_7901&CC_0106 %AMDSATA.DeviceDesc% = amd_sata_inst, PCI\VEN_1022&DEV_7904&CC_0106 %AMDSATA.DeviceDesc% = amd_sata_inst, PCI\VEN_1022&DEV_43C8&CC_0106 -Open up amd_xata.sys with hexplorer or equivalent, find and change ntoskrnl.exe -> ntoskrn8.sys. -Apply PEChecksum.exe on amd_xata.sys DEV149C Matisse USB 3.0 Host Controller usbxhci 6.2.9200.xxxxx Backported generic Win 8 USB3 driver from NTOSKRNL_Emu works. Needs WDF1.11 backport as well. NVMe Generic Windows 7 NVMe Option2: stornvme 6.1.7601.23403 Backporting Windows 7 NVMe drive works. No SMART info. NVME Samsung Option3: 3.3.0.2003 Backport the Samsung NVME driver. secnvme.sys and secnvme.sys imports need to be changed to NTOSKRN8.SYS like with the other drivers. No SMART with CrystalDiskInfo but it does work with HWiNFO. I only have a Samsung NVME so havent tested if the generic works with other brands. Chipset Drivers (null) DEV790B FCH SMBus Controller Null driver. Download an old 13.4 XP/XP64 chipset pack from AMD or get Windows 7 for the B450 chipset. Open up SMBUSamd.inf and add in these two lines underneath existing DEVs: %AMD.DeviceDesc0% = AMDSMBus, PCI\VEN_1022&DEV_790B %AMD.DeviceDesc0% = AMDSMBus64, PCI\VEN_1022&DEV_790B DEV1481 Starship/Matisse IOMMU Null driver. Download an old 13.4 XP/XP64 chipset pack from AMD or get Windows 7 for the B450 chipset. Open up AmdIOV.inf and add in this line underneath existing DEVs: %IOMMU.DeviceDesc%=NULL_DRIVER,PCI\VEN_1022&DEV_1481 DEV1486 Starship/Matisse Cryptographic Coprocessor PSPCPP Install null driver to remove from missing devices. DEV1485/148A Starship/Matisse Reserved SPP/PCIe Dummy Function According to the readme this should also be a null driver. Unlike the SMBus and IOMMU, this one has a sys file that tries to install. Update inf to add DEV1485 and DEV148A. ACPI\AMDI0030 Install null driver to remove from missing devices Extra Stuff VMware and USB flash drive passthrough When using VMware, if you connect a USB flash drive and try to pass it through to the guest OS, you will need to use a USB port that is using the generic backported USB driver in the host OS. It does not work then using the AMD USB31_PT 1.0.5.3 chipset drivers from the motherboard. From the article it looks like other motherboard specific drivers will have the same issue with a few exceptions. Once you get the Win8 USB3 up and running, you can replace the AMD motherboard USB drivers. https://kb.vmware.com/s/article/2041591 Tested with: XP64host with VM10.0.7(last XP version) and Win7x64host with VM10.0.7 & 15.5.6(last Win7 version). Testing passthrough with a Kingston USB2.0 flash drive works fine. But when connecting a Kingston USB3.0 flash drive vmware gets a "unable to connect to ideal host", and the drive does not load properly in the WinXP guest OS. VMware and USB3.0 flash drive If you change the USB compatibility in vmware in Settings from 2.0 to 3.0, then install the backported generic drivers to the XP guest OS, it will work properly. Note that the vm image hardware compatibility mode has to be 8 or higher, if you are using an image set to 6.5-7.x mode or lower then the USB 3.0 drop down menu will not show up.1 point
-
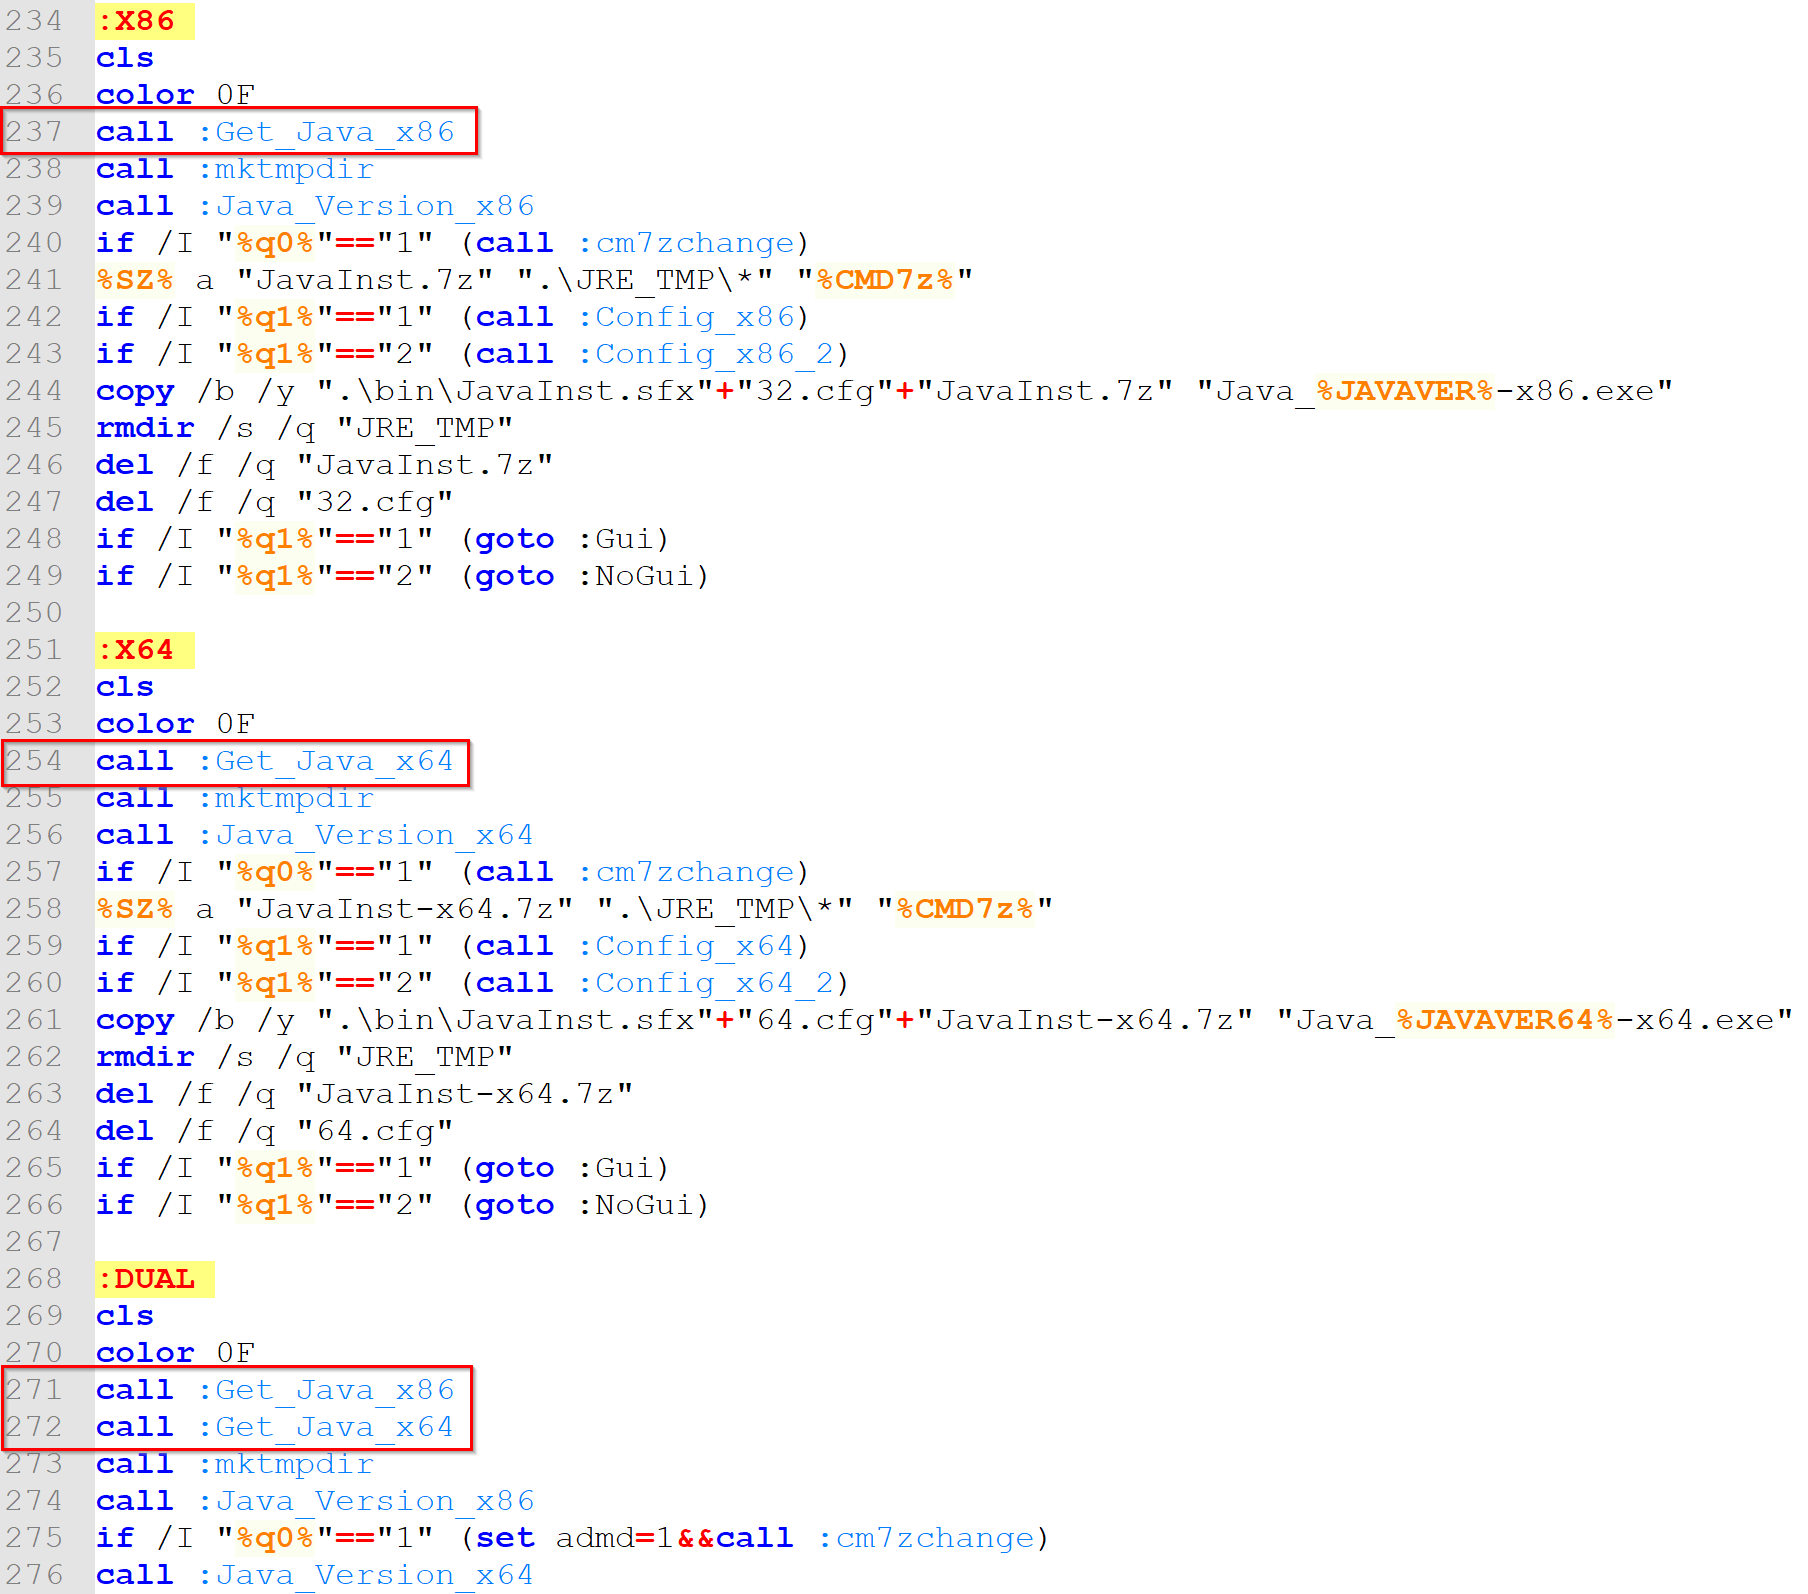
Either cancel the download (use Ctrl+C) or comment/delete the lines 237, 254, 271 & 272 in the script.
1 point
-
mooms maybe I'm not doing it right. I now have these files. SFX_WinRAR_x64_6.01-nl.exe WinRAR_AddOn_x64_6.01-nl.zip (do i need to unzip this folder ?) And what should I have started in my setupcomplete.cmd? I have this line in it now, IF EXIST "%SLocal%\SFX_WinRAR_x64_6.01-nl.exe" "%SLocal%\SFX_WinRAR_x64_6.01-nl.exe" Should I place the WinRAR_AddOn_x64_6.01-nl.zip along with SFX_WinRAR_x64_6.01-nl.exe in my Windows 10 ISO1 point
-
Updated to v 10.0 February 8, 20211 point
-
It is a very good change. Regards... ;-)1 point
-
If I'm not mistaken: [Code]varPinTaskBarCheck : TNewCheckBox;//the function is work well on Unicode Inno Setup, //if Non Unicode Inno Setup, one need to modify,//and I think you can do it!//Inno use Win32 APIfunction LoadLibrary(lpFilename : String) : LongInt;external 'LoadLibraryW@kernel32.dll stdcall delayload'; //if Non Unicode Inno Setup, use LoadLibraryAfunction FreeLibrary(hModule : LongInt) : BOOL;external 'FreeLibrary@kernel32.dll stdcall delayload';function LoadString(hInstance:LongInt; uId:UINT; lpBuffer:String; nBufferMax:Integer) : Integer;external 'LoadStringW@user32.dll stdcall delayload'; //if Non Unicode Inno Setup, use LoadStringA//here is the function//@param strPath The App's directory,//@param strApp The App's name//@example zylPinAppToTaskbar('c:\window', 'notepad.exe');procedure zylPinAppToTaskbar(strPath, strApp: string); var vShell, vFolder, vFolderItem, vItemVerbs: Variant; vPath, vApp: Variant; i: Integer; sItem: String; h: LongInt; szPinName: String; filenameEnd : Integer; filename : String; strEnd : String;begin SetLength(szPinName, 255); h := LoadLibrary(ExpandConstant('{sys}\Shell32.dll')); LoadString(h, 5386, szPinName, 255); FreeLibrary(h); strEnd := #0; filenameEnd := Pos(strEnd, szPinName); filename := Copy(szPinName, 1, filenameEnd - 1); if (Length(filename) > 0) then //WinXp or lower, no pin taskbar function begin vShell := CreateOleObject('Shell.Application'); vPath := strPath; vFolder := vShell.NameSpace(vPath); vApp := strApp; vFolderItem := vFolder.ParseName(vApp); vItemVerbs := vFolderItem.Verbs; for i := 1 to vItemVerbs.Count do begin sItem := vItemVerbs.Item(i).Name; if (sItem = filename) then begin // 63 63 72 75 6E 2E 63 6F 6D vItemVerbs.Item(i).DoIt; break; end; end; end;end; //You can use zylPinAppToTaskbar like thisprocedure CurPageChanged(CurPageID: Integer);begin //When Finished page is shown, call the function //You can also call is when the "Finish" button clicked. if CurPageID = wpFinished then begin if IsTaskSelected('pintaskbar') then zylPinAppToTaskbar(ExpandConstant('{sys}'), 'magnify.exe'); end;end;zylPinAppToTaskbar(ExpandConstant('{sys}'), 'magnify.exe'); Regards... ;-)1 point
-
Hi... to help you better, what is the program, which you want make installer...? Regards... ;-)1 point
-
Already has, I added it to my AIDA64 installer and its working perfectly (even removes it on uninstall)1 point
-
All-In-One Integrator
vaveasna reacted to Legolash2o for a topic
For some reason your DVD folder will be set to read-only. Right click on the folder and untick read-only.1 point -
I am not seeing ANY of my ISOs in the AIO Integrator. Browsing for extracted DVD then nothing is even visible? I tried mounting one of the ISOs to see if I could see it which did work. But Win Toolkit 1.4 tells me I must copy a DVD to a folder first. Frustrating! lol I've done this before.1 point
-

All-In-One Integrator
vaveasna reacted to 'Jack Reeve for a topic
I Dont appear to have the Silent Install tab on V1.4.0.15
1 point -
Hi, DaRk MaDnEsS Just a suggestion. I added this tweak to give faster access to cabmaker3 w/o waiting for sendto menu to appear. [1stLevelContextMenu.AddReg] HKLM,"SOFTWARE\Classes\*\shell\Cabmaker3",,0x10 HKLM,"SOFTWARE\Classes\*\shell\Cabmaker3\command",,0x0,"%11%\Cabmaker3.exe ""%%1""" HKCR,"Directory\shell\Cabmaker3\command",,0x0,"%11%\Cabmaker3.exe ""%%1"""1 point
-

Real Player 10.5 Gold ... If you are interested
大†Shinegumi†大 reacted to NIM for a topic
Or you can use Real Alternative instead1 point